Clever DIY Ideas That'll Make Use Of Any Extra Bricks

We may receive a commission on purchases made from links.
Bricks have so many uses around the home for those with the tools and DIY know-how to get the most out of them. What's more, some suppliers allow you to buy in bulk, allowing you to pay less per brick while providing yourself with enough materials to tackle a multitude of projects. But what do you do if you over-bought, or you end up with a bunch of broken leftovers?
Fortunately, there are lots of ways to use leftover bricks to level up your garden décor. Those who enjoy back-to-basics cooking or the simple pleasure of flames after sundown can contribute their bricks to a cozy new fire pit. On the other end of the elemental scale, it's also possible to build a beautiful water feature with just bricks and a few readily-available accessories. You can use them to create charming hand-crafted decorations, to bring some designer-grade dazzle to your trees and flower beds, and there are several ways they can help you to invite more wildlife into your yard. In other words, there are plenty of ways to use such an embarrassment of red-hued, rectangular riches to your advantage.
Build a cozy fire pit

Depending on the kinds of bricks you have leftover, they can be used to create fire pits in an array of shapes and sizes. If you intend to build the entire structure with your bricks (including inner walls and the base), you should only do so if you have concrete pavers, or ideally, fire-safe refractory bricks, as regular bricks are prone to cracking when exposed to high heat. If you have regular bricks piled up in your yard, use them aesthetically. For example, you could create the inner-wall of your pit with fire-safe pavers or dedicated fire bricks, then use regular red bricks around the outside, giving it a rustic, red-hued finish. Alternatively, you could build a temporary, bushcraft-style fire pit or smoker out of red bricks, knowing they may crack.
However you build your fire pit, the first thing you'll need to do is mark and dig out a base, being sure to do it in an area where flames won't pose a risk to any structures. As for the materials you'll need (other than your bricks, of course), it's possible to create a fire-proof base yourself, although it might be easier and more convenient to buy something like the 36-inch fire pit ring from Innostage. The latter will keep coals contained, while allowing you to mount a grate over the top, perfect for grilling, or setting a pan or kettle on top of.
Finally, if your bricks or pavers are designed with notches to slot together, consider how you'll keep them in place long-term. You won't necessarily need to bind them with mortar if the structure is well built. But if you do, it's a good idea to use a refractory mortar (one that can cope with high temperatures). This will help keep regular bricks in place, while lending your fire pit a longer lifespan.
Construct a water feature
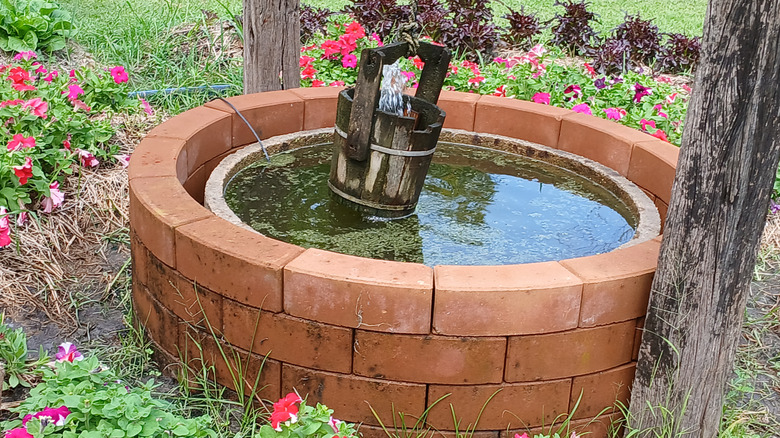
There are lots of head-turning ways to add water to your garden, many easily achievable if you have spare bricks. One idea is to build bricks up into a waterfall feature. You'll need your bricks, a container to serve as a water reservoir (unless you already have a pond), a submersible pump to move the water against gravity, and some tubing through which to pump it. Once equipped, use your bricks to build a hollow, circular or cube-shaped structure, with a void between the walls that's large enough to fit your container. With your pump submerged, feed the tubing up through the void, continue to build up with bricks on the back half of your structure, hiding the tubing as you go. If you have the masonry skills, you can cover a brick structure with cement to give it a smooth, professional-looking finish.
Other ideas include using bricks to add interest to an existing pond, or creating a new one altogether. Again, you'll need either a plastic container or a dedicated plastic pond basin. Once you've sunk the container in the ground, dig a trench around four inches deep around the perimeter, then line it snugly with bricks. Finally, although it isn't essential, it can be worth adding a running water system to your pond. While there are several things that attract mosquitoes into yards, standing water is one of the most common. With that in mind, it can be worth purchasing a submersible pump, like the solar pump and fountain kit from Poposoap to keep water moving. Add a filtration system, or maintain water quality with aquatic plants, which can filter out sediments and soak up excess nutrients that might otherwise encourage algal bloom.
Increase biodiversity in your yard with a brick bug hotel

There are many ways to turn your yard into a wildlife haven, and this one is easy. All you need are some bricks, some old lengths of wood, and some straws or hollow reeds. These spaces work well for solitary pollinators like native bees, ladybugs, and other critters. Even if you don't have much wood lying around, you could always pay your local hardware store a visit and see if they have any delivery pallets out back that they're happy to give away. Failing that, it could pay to scan local online marketplaces or Buy Nothing groups.
Once you have your pallets, build a sturdy base with your bricks.From there, build up your hotel vertically by using the bricks as plinths to support each new layer of pallets. The bricks will also provide housing if they have perforations. The spaces created between brick or board layers provide ample space to hold organic materials like pine cones, cut branches for bees to burrow into, or hollow reeds for instant residence. You can even fill the space with old soup cans to attract even more native bees. With this in mind, keep hold of garden waste like dead wood, loose bark, and bamboo, all of which will provide a home for various critters.
Build a raised garden bed
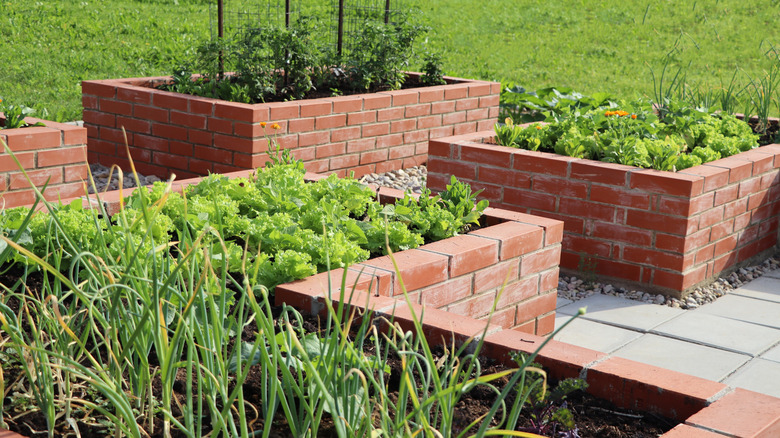
There are several advantages to growing vegetables in raised beds rather than in the ground. And if you have a pile of bricks going spare, it's possible to create a sturdy structure that promises to last — often far longer than other, more traditional materials like resin, plastic, or wood. Even cedar and redwood, while more naturally weather resistant, will eventually degrade. They're also more expensive than cheaper alternatives like pine. Bricks, however, are designed to last — there's a reason we build houses with them — and if you already have a pile awaiting orders, they needn't cost you a dime.
Another benefit of using bricks is that they can be used to create unique shapes — ideal if you want to match your bed to a curved area of your garden. If you're building a bed any higher than about eight inches, then bond them with mortar. In general, mortar is recommended, particularly since you're filling the interior space with dirt and water which will push out against the brick. You should also lay them on a concrete foundation, which in turn should be laid on a six-inch deep hardcore foundation. This will provide a stable, level base for building up brick walls and ensure long-term durability.
Edge your flower beds beautifully

If you want to plant flowers or bushes in an attractive display around your yard, you'll want to dig flowerbeds. And while the actual digging part is relatively straightforward (requiring little more than a shovel and a sturdy back), making them feel like a considered, permanent part of your landscape requires a little extra work. The easiest way to do this is to edge them, which essentially means marking the boundary of your beds with a material of your choosing. And as with raised beds, there are several materials with which you can do this.
One lawn-edging idea that can help take your backyard to the next level is to line your beds with bricks. With the beds already dug, you'll be pleased to know that you can retire the shovel to your shed. While you're in there, fish out a trowel and a rubber mullet, and if you don't have them already, source yourself some building sand and cement. Suitably equipped, you'll need to rake the flower bed soil away from where it meets your lawn, before spreading a layer of sand-cement mixture along the edge of the raked area — the one closest to your lawn. Place bricks along the mixture and press them gently into place, ensuring that the end of each brick sits flush with the next. Tamp them down with your mallet such that everything is even and level, then allow the mortar to dry. When it is, just rake the soil back until it meets your bricks. Not only is brick edging attractive, it helps prevent grass and weeds from expanding into your flowerbed.
Bring wildlife into your yard with a DIY bird bath

This idea can be as simple or as complicated as you choose, but by using your bricks to make a birdbath instead of throwing them away, you'll increase the biodiversity of your yard. What's more, depending on how you go about it, you'll be surprised by just how many winged visitors find their way into your garden. The first way to do it is easy — simply stack a few bricks to create a short platform, then place your bird bath basin on top. You'll want to use a liquid block adhesive to make sure your bricks and bath don't topple.
If you have a lot of bricks to use up, get creative with a taller structure by creating a homemade, recirculating birdbath. This idea is, admittedly, a little more involved than the first, but since birds absolutely love running water, it's worth the effort. As with the fountain above, to get the water moving, you'll need to invest in a submersible pump, a fountain, and some tubing, and you'll also need a container to serve as a water reservoir. Stack bricks around the reservoir, concealing it, or elevate the basin on a brick pedestal. In this case, leave the center of your structure open to ensure the water spills over the bath straight back into the reservoir.
Use your bricks as plant pot fillers
This idea is great for three reasons. The first is that it's super simple, requiring you to simply fill your plant pots instead of throwing your bricks away. And you can even use broken bricks for this hack. The second is that it could help save you a small fortune, especially if you have lots of large pots to fill with soil each season. By filling a layer in the bottom of your pots with a few bricks, you'll naturally need less soil with which to top them up, allowing you to fill more pots with fewer bags. They also help with soil aeration, preventing compaction at the bottom of the pot, helping to reduce root rot.
The third reason is that by adding weight to the bottom of taller, narrower pots, you can help to keep them stable, ensuring there's plenty of weight at the bottom to prevent them from tipping over. Now, it's worth mentioning that there are occasions when using bricks in the bottom of pots may not be a good idea, namely when you have plants that need excellent drainage. Using blocks in the bottom of your pots can create what's called a "perched water table," effectively causing water to collect above the bricks and leaving more delicate roots at risk of overwatering. Also, if you need to move pots from sun to shade or inside during the winter, the added weight of bricks may become an issue.
Turn leftover bricks into a beautiful garden pathway
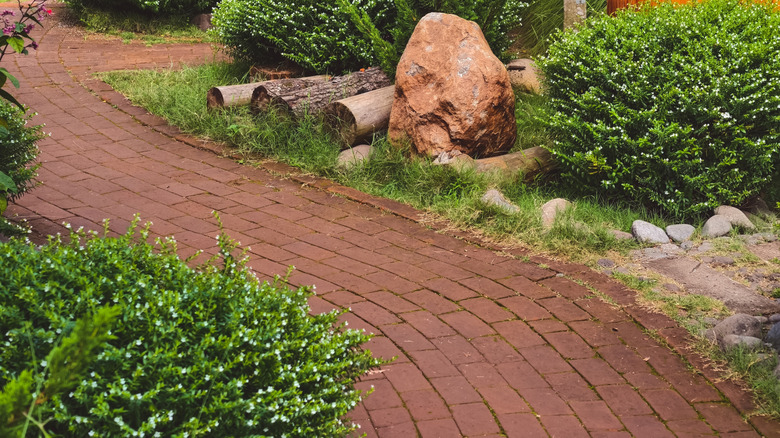
This idea is a little more involved than some of the others in this guide, not least because you'll need the tools and DIY know-how to ensure that your new path holds up to foot traffic. However, when done properly, repurposing bricks to make a garden path can yield spectacular results. To achieve them for yourself, you'll need to equip yourself with landscape fabric to act as a weed barrier, gravel, plus two types of sand — regular sand or grit for the laying course, and kiln-dried sand for block joint paving over bricks. You'll also need a shovel.
With all of your materials gathered, the first thing to do is to dig out your proposed pathway. Be as meticulous as you can, ensuring that your dug area is deep enough (about 8 inches) to accommodate the depth of both your sand and gravel — crucial for proper drainage beneath your new walkway. Ensure that the surface remains level, and don't forget to account for the depth of your bricks, or you may end up with more of a bridge than a path!
Once the area is dug, lay your weed barrier. From there, create a four-inch substrate with gravel, then two inches of regular grit sand. Ensure the surface of the sand is as level as possible, then begin placing your bricks in your chosen pattern (broken bricks can be used to create mosaic designs), tamping them down into the sand so that they're nice and sturdy. Finally, to keep your stones in place and keep water out, pour fine, kiln-dried sand over your bricks, sweeping it into the joints with a soft brush.
Build a spiral herb garden

Not only is building a spiral-shaped herb garden an eye-catching addition to your garden, but it's also a smart way to grow herbs. Because the garden ascends in height as it approaches the center of the spiral, herbs that prefer drier roots and lots of sun, like basil and oregano, can perch both high and happily in the middle, while those that can get by with a little shade and damper soil, like thyme, can occupy the spiral's lower elevations.
To build one, you'll need bricks, mulch material like cardboard or gravel, and soil. To begin, find a flat, sunny spot, ideally within easy walking distance of your kitchen door. Next, lay or spread your mulch material over the area. Mark out your spiral shape, either with bricks or with some flour, until you're happy with the outline. Make sure to account for the dimensions of your bricks whatever their size, ensuring that the interior space between walls will provide plenty of room for planting — at least 12 inches. Once marked, build up the brick spiral from the outside in, increasing the height as you approach the center. The idea is you'll have an ascending, continuous spiral-shaped planting area.
With your spiral built, it's time to fill it with your soil. And before you spend a fortune on bags from your nearest garden store, don't! Regular garden soil is usually fine, in fact there are many herbs, including rosemary, sage, and thyme, that actually prefer poorer soils. As long as yours is not overly fertile and has a roughly neutral pH, you can forgo the trip to the store. Also, it's generally recommended to avoid planting mint in this little herb garden, as it can spread quickly and outcompete the other plants.
Use your bricks to create a tree ring

If you have trees in your yard, it's worth surrounding them with mulch and creating a grass-free zone for roots and trunks to thrive. It also looks cleaner and more attractive to have a defined circle of soil or mulch around them. Consider using excess bricks to create a tree ring. Not only will this create a defined, attractive space around your tree, but it will also prevent mulch or soil from spilling over into your lawn, and grass or weeds from nestling up to your tree. What's more, if the bricks are leftover from another outdoor DIY project, you'll find that a matching brick surround helps tie your trees into your overall garden aesthetic.
To create your custom tree ring, you'll need to mark and dig out a trench around the tree, a little wider than the bricks. You can lay bricks vertically or horizontally, and use whole or broken pieces. The design is up to you. Place bricks in the trench, tamping them gently into the soil. Backfill enough soil to hold them in place, and tamp down everything again. If you want to create a shady flower bed, ensure that you build the ring high enough to fill with soil.
If you're adding a layer of mulch, avoid piling it around the base of your tree. Also known as "volcano mulching," this can lead to several issues, including reduced water and oxygen intake for the roots, a build-up of unfriendly bacteria in any retained moisture, and welcome pests like rodents. To avoid these headaches, leave the root flare at the base of your tree exposed, and mulch in a "donut" around the tree to a maximum depth of 3 to 4 inches.
Engrave your bricks and turn them into garden signage
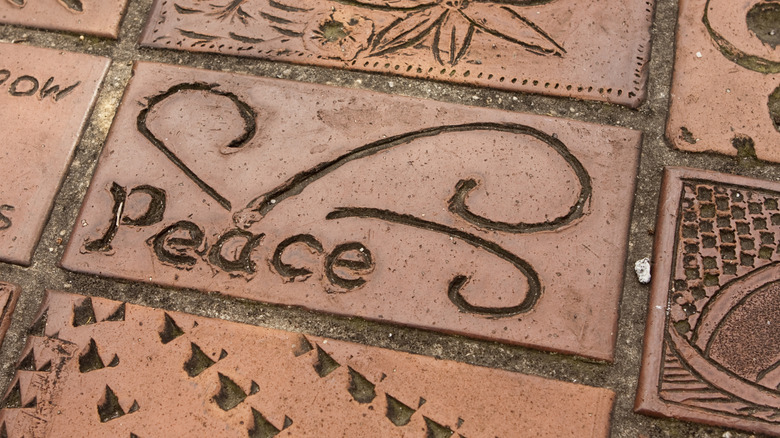
In reality, you needn't actually engrave your bricks, although that's certainly possible for those who are armed with the right equipment, like the pricey OMTech Pronto 100 watt CO2 laser engraver. If you're not, you can easily achieve this idea with something as simple as a Sharpie or outdoor paint. If you don't have the neatest handwriting, it might be worth enlisting the help of a friend more calligraphically inclined, and have them mark bricks with your chosen labels.
As for what to write on them, you could use your bricks to identify specific herbs or fruit plants, perhaps marking one with "hands-off" to ward off hungry children. Alternatively, you could create a multi-bricked family mural and give everybody in your household the chance to add their design. If you're planning to take this guide's earlier suggestion and build a garden path with bricks, consider engraving those bricks closest to your garden gate with a "welcome" message for visitors. You could even carry over design motifs from wall art, prominent flower blossoms, or tile patterns from your upgraded front porch.