Outdoor Upgrades You Should Consider Making During The Winter Months
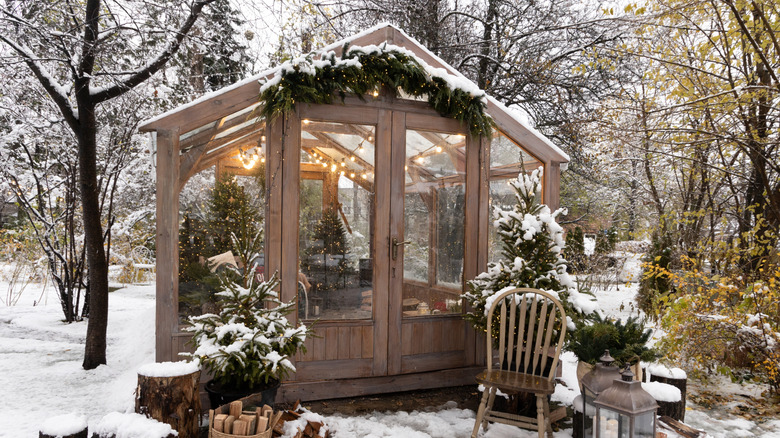
While you may think winter isn't the best time of year to invest in your outdoor spaces, it's actually a great time. Even if you live in a snow-prone area, this often overlooked season provides us with unique opportunities to tackle yard projects that don't need to wait for warmer weather. If you've been dreaming of a new shade structure, or those flower beds would benefit from another layer of mulch, the upgrades you make during the chilly months will lead to big differences come spring. Just imagine how much less stressful spring and summer will be with these projects out of the way.
Sprucing up the backyard during the winter months also means it's easier to find an available contractor as peak demand slows to a crawl. Cooler temperatures are more inviting than working under the blazing summer sun. And with loads of budget friendly options, these goodies won't cut too deep into your year-end budget. So, grab your yard tools and a pair of garden gloves and let's get started with these outdoor upgrades you should consider making during the winter months.
Trim back trees and shrubs for spring growth
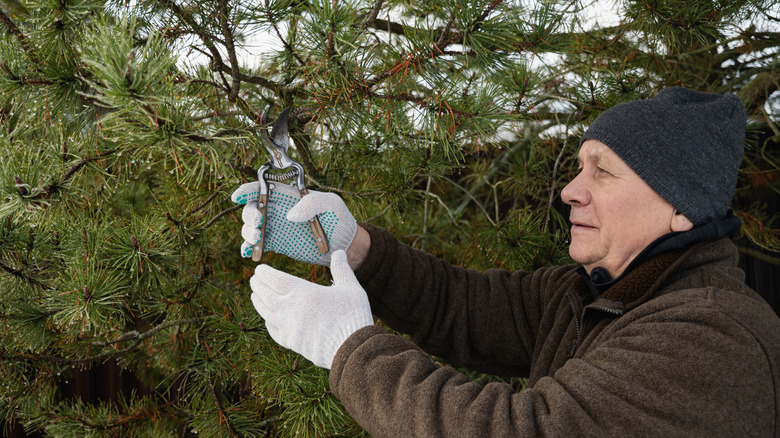
Make winter your go-to season for landscaping projects, because some upgrades shouldn't be put off until the growing season, like pruning certain fruit trees and berry bushes in winter. Trimming back trees and shurbs is one gardening activity you want to consider tackling over the big chill, even in areas with heavy snow. Most plants go dormant this time of year and once they've dropped their leaves, it's so much easier to see dead or damaged branches that, when removed, will promote healthy growth and reduce moisture that could cause bacterial and fungal infections once the cold has faded. Because pests are also hibernating this time of year too, there's no risk they'll enter the tree through the pruning cuts.
Start pruning in late winter, typically during February, and make sure to use sharp, clean tools, reducing the risk of injuring trees and shrubs. In addition to branches that are obviously dead, look for signs of disease, insect infestation, and storm damage, and prune those as well. The goal here is to guide growth, create an appealing shape, and to maintain health and structure. There are loads of deciduous trees and shrubs that would benefit from winter pruning including maples, walnut, birch, dogwood, honeysuckle, and sumac. But beware, not every plant should be pruned during the winter months, particularly spring-blooming shrubs, like lilacs, azaleas, and most hydrangeas. If you trim those plants in winter, as you'll see fewer blooms come spring.
Make a DIY firepit for that extra cozy factor

The winter months provide us with a unique advantage for tackling outdoor projects that are both beautiful and functional, like a DIY backyard fire pit made from extra pavers or even a washing machine drum. If you love to entertain outdoors, installing this glowing feature over winter will provide plenty of reasons to get outside and enjoy your yard on chilly nights with a few mugs of hot cocoa and some roasted marshmallows.
The good news is that a DIY fire pit can be crafted and installed pretty much any time of year, even when Jack Frost is nipping at your nose. Beyond boosting your yard's snug-as-a-bug vibe, this eye-catching heat source's versatile and year-round usability maximizes your yard or deck time. Not only is this a great project to work on in the winter, it can be a good one to actually use in winter as well.
If you're not up for a wintertime building project, no problem: Many companies put fire pits on sale during winter clearances, and with the right timing, you can cash in big. Shop after the holidays during January and February for terrific deals on this choice outdoor upgrade, and as long as you're flexible about style, you could save hundreds.
Add dramatic outdoor lighting fixtures
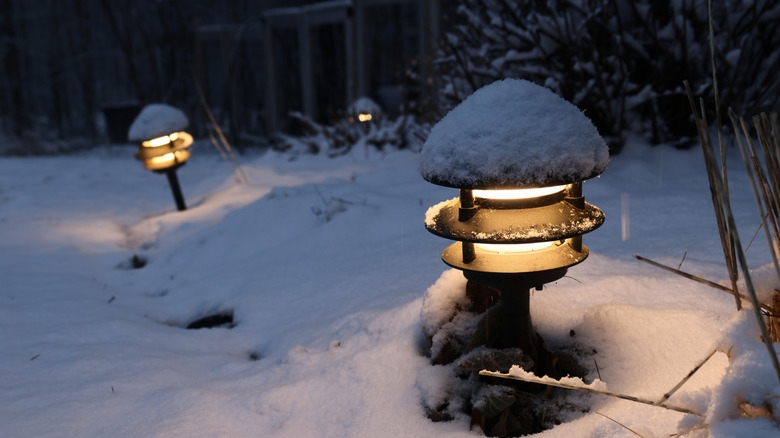
Even the smallest touches can make a big impact on the overall look and feel of your yard, and one of the top ways to upgrade your outdoors spaces during the winter months is by putting a little light on the subject. During these dismally short, dark days when we want nothing more than to hunker down inside, lighting can add some irresistible magic to your outdoor spaces and there's really no limit to the warm and welcoming options here.
Use a few durable, weather-proof solar stakes to safely illuminate your pathways, hang festive lanterns on bare tree limbs, or add a Dollar Tree DIY solar light to tables in sitting areas. For a little atmosphere, wind twinkling fairy light strings around trees or birdbath columns to enjoy season after season. Not only does the right type of outdoor lighting add a touch of elegance to your outdoor spaces, but in the winter, this upgrade is a terrific way to accentuate your yard's focal points, like a slumbering sculpture or an otherwise dark flagpole waiting for spring.
With your plants bare of leaves and foliage, lighting installation is much easier and you don't need to worry about damaging stems, new growth, and flowers as you might during the growing season. Admittedly, putting in stakes or underground wiring could be difficult if the ground is frozen, however using a heat gun may help or you can just stick to string lights or lanterns to create your enchanting winter spectacle. Remember to opt for warm, white or yellow light as opposed to cool blues during wintertime and incorporate a layered approach with an array of different lighting sources to really set the mood.
Plant a few bare root trees for added privacy
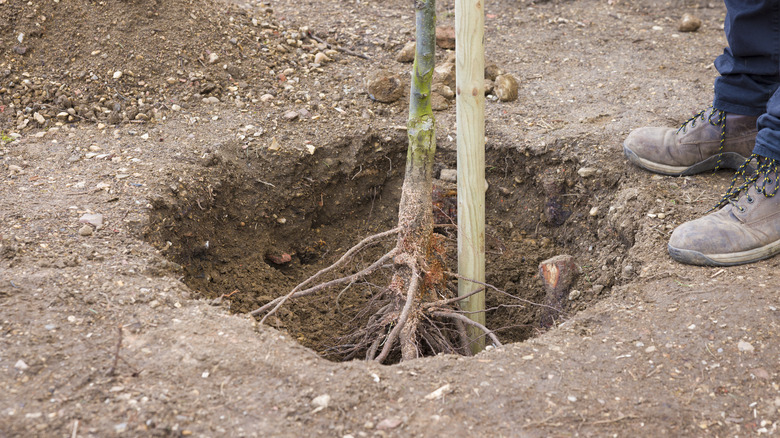
If you've considered planting a few trees to upgrade your outdoor space with a living privacy screen, the bare root option may be the ideal way to kick start your woodland wonderland. Planting a few over the winter months is a relatively simple way to branch out. These trees, sold without containers or soil around the roots (hence the name) are typically a year or two old and sold during the cold season when the tree is dormant. While these specimens may appear dead, don't worry, they're just sleeping.
Because these trees are sowed in the ground, they have a significantly larger, and more developed root ball, sometimes twice as large as those grown in containers. They're less costly than other nursery offerings, too, often selling for under $10. Bare foot trees are easier to manage than bulky container trees, making them the ideal choice for tree whisperers who are planting solo. Dig in and choose varieties that add color and texture to your backyard scene. White oak's red fall foliage, longleaf pine's lasting evergreen needles, and American snowbell, with its fragrant white flowers, are the cream of the crop.
Planting your bare foot trees this season gives them the chance to put down strong roots before spring, but where you sow them matters. Look for a sunny spot to plant your privacy wall with well-draining soil, and soak the tree's roots in water for a couple hours before putting it in the ground. The hole should comfortably accommodate the entire root ball. Gently backfill the soil until only the root flare is above ground, and add a stake for support. Now, give it a good watering, and cover the area in a layer of mulch.
Add a fresh layer of protective mulch to your beds
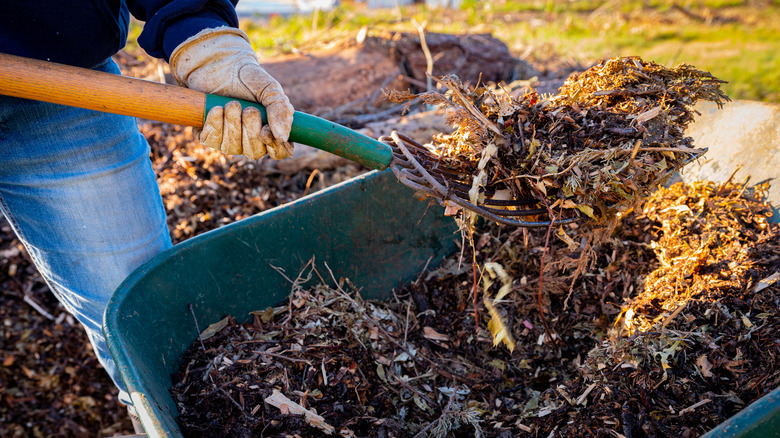
Rejuvenate your garden beds over the frosty season by adding a fresh layer of mulch. A supplemental layer of fresh bark or leaves helps protect your plant's precious root system from drastic temperature fluctuations by keeping the ground warm all winter. If your mulch is too thin, frost heaving could damage your favorite perennials, trees, and shrubs. This proactive cozy blanket also lets you get ahead of weed growth and minimizes the damaging effects of the season's dry conditions, helping to store just the right amount of moisture. The polished look of a fresh mulch layer will also boost your home's curb appeal, but if you're not sure how to choose the right mulch to use in your winter garden, look for one that's insulating yet offers plenty of airflow.
So, what's the best approach to take here when making this outdoor upgrade? For healthier and more vibrant plant growth during peak seasons, start by gently raking the existing mulch layer, especially if it's compacted and hampering water and air flow, breaking up any clumps that may have formed. If the old mulch has decomposed and its color has noticeably faded, top it with up to two inches of shredded bark, leaves, pine needles, or your preferred material, but don't exceed a total of about 4 inches of depth (3 inches provides good insulation in very cold areas). You also want to steer clear of trunks and stems. A four-inch "donut" gap ensures good circulation to prevent root rot and keep pests at bay.
Repair outdated or damaged pathways for safety

Stepping stones, garden paving, and pathways add upgraded charm and a sort of backbone to your yard by defining usable spaces while providing structure. Whether your walkways are stone pavers, bricks, or DIY stepping stones using a vintage kitchen find, they make outdoor areas more accessible. But these garden paths need routine maintenance for optimal functionality and visual appeal. Repairing, reinforcing, or replacing damaged sections is an ideal task to take on during the winter months. This process can prevent minor cracks from getting out of hand, reduce trip hazards during icy conditions, and make snow removal a bit easier.
During the winter months, there's less risk that you'll disrupt dormant plants around your repairs, and both materials and labor may be discounted. So, before the next cold wave comes through, give your walkways an upgrade by replacing damaged bricks and filling in cracks on pavement to keep water out. When water gets trapped underneath your pavers, it can freeze and expand. This process is called frost heaving, and it can really do some damage. You'll also want to focus on replacing broken pavers, re-leveling those that have sunk, and adding another layer of polymeric sand to prevent weed growth. You may want to seal patios or other larger paved spaces.
Use a plastic shovel or one with a rubber-edge to clear snow and ice gently from your walkways. It'll prevent damaging the brick surface, extending its lifespan. Never use rock salt that contains sodium chloride to de-ice stone pathways: It can corrode the material and may be harmful to plants. Natural de-icers, like sand instead of salt, boost traction and are a less destructive option. It's also easy to sweep sand into joints come spring.
Install retaining walls for function and appeal
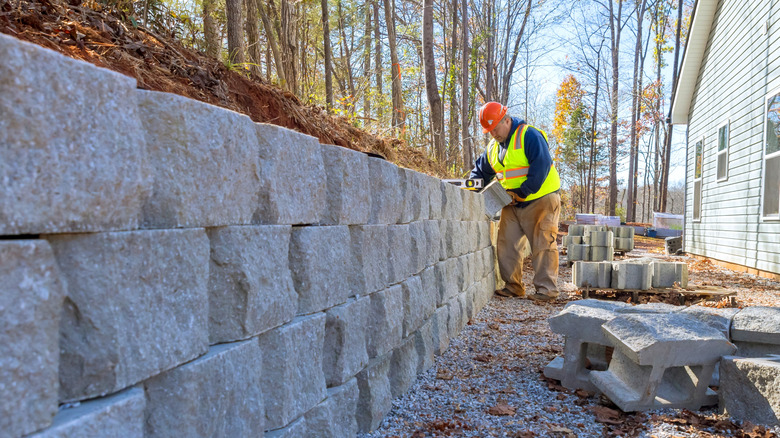
Retaining walls are a terrific way to upgrade both the functionality and visual appeal of your outdoor spaces. Use them to manage steep sloping areas and post-thaw soil erosion or build a few multi-tiered garden beds. Come spring it'll be the ideal spot to plant succulents on top and Hosta on the lower levels, for instance. And the good news? Yes — you can get your hands dirty with this project well before the vernal equinox rolls around.
One of our best tips for building a stone retaining wall on a budget for your garden is to choose affordable materials. It's off-season for installers and suppliers, so it's possible you can save some green on blocks. Try scoring a discount on leftover stock, and if you do have to order something, it's pretty likely you'll get faster delivery times than you would during peak season. Surprisingly, winter is one of the best times to start a retaining wall project because installation crews are readily available. Plus, well, you get to bypass that wet spring weather when the ground is saturated, making fun outdoor upgrades like installing a retaining wall a drag.
Of course, freezing temperatures may prevent you from taking on large retaining wall projects, and that's understandable. But that doesn't mean you can't get a jump start on the project as you while away the season basking in the yule log's glow. If you're not really DIYer, connecting with a professional installer over winter will ensure you're first on their schedule, so you can get ahead of spring rain's heavy runoff with your new retaining wall.
Put together a few raised beds for spring planting
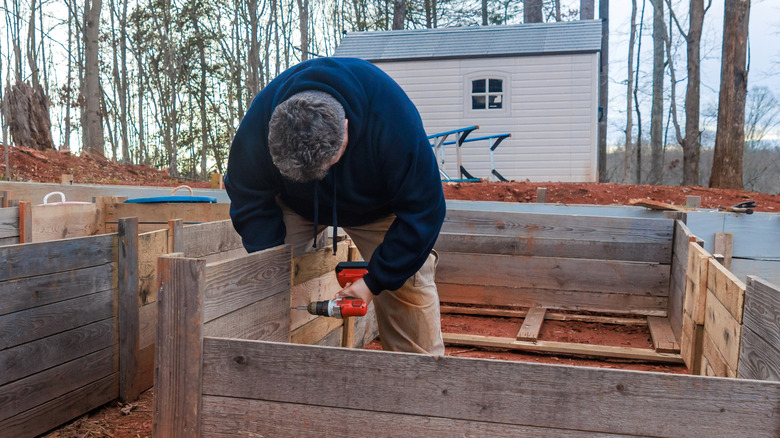
Putting together a few raised beds is another fun DIY overwinter project that'll make a huge difference in your outdoor spaces come spring. Building materials, like cedar planks, are often less expensive in the winter. This is particularly true in December through February due to lower demand, making this season a cost-effective time to upgrade your yard. But if woodworking isn't your top talent, there are loads of ways you can build a budget-friendly raised bed, even out of something as simple as patio chairs and storage bins.
Raised beds offer gardeners plenty of perks. While individual pots work well in many applications, they break easily and can be quite costly if your goal is to grow food. Raised garden boxes also stay warmer, extending your growing season, and if you suffer from joint problems, they make tending to plants much easier on your knees and back. New raised garden beds are also a terrific way to define your yard, organizing your outdoor space both visually and functionally.
Elevated beds allow you to really maximize production in a small space, especially if you have poor quality soil. You can fill them with fresh, nutrient-rich dirt that's specifically mixed for your application. A general purpose blend of 40% topsoil, 40& compost, and 20& coarse sand or perlite (to boost draining) works well in most instances. Install your newly assembled beds in a flat, sunny part of your yard, but consider waiting until the snow melts before you line them with landscaping fabric and add the soil. When warmer days do finally arrive, you'll be ready to sow your seedlings.
Add shade and style with a custom pergola
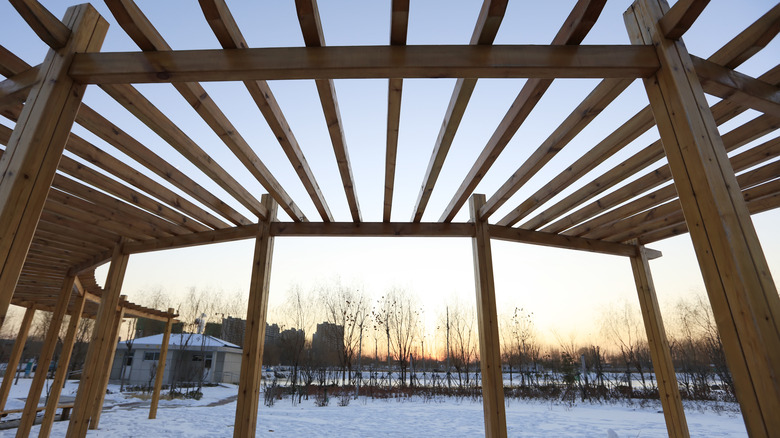
Finding shade is probably the last thing you think about doing during the bitter cold of winter. But if you've been whiling away the cooler days dreaming about a custom pergola, winter is actually the perfect time to get started. This attractive structure delivers loads of charm and function to your outdoors spaces by creating a striking focal point, whether drawing attention to, say your pool area, or distracting from an unsightly view. If your yard is lacking a patio or deck, this might be the next best thing to create a comfortable and appealing gathering spot, too.
A pergola outfitted with a canopy and drapes will provide plenty of shade during the hot summer months, as well as some protection from rain and snow, making it a lovely place to hang out as each season unfolds. They can even add a touch of privacy to a backyard hot tub. After all, if you're lucky enough to have one, it's perfect in winter: A therapeutic spot to melt away cold-induced muscle stiffness and reduce stress.
As with other building projects this time of year, off-season lumber and material prices are usually slashed, and if you need to contract it out, builders have more availability during the big chill. The permitting process may also be faster, since there are as many applications. Once the structure is complete, add a few high-quality, weather-resistant furniture pieces underneath that invite you and your guests into this well-defined space. Now, just imagine hosting a holiday party and sipping a mug of hot buttered rum under the roof of your new custom pergola. Cheers!
Get a jump on springtime planting and start your seedlings indoors

Depending on where you live in the country, winter can be a long, drawn out affair. But when you start your springtime seedlings indoors, you more than get a jump on the planting season. You keep your green thumb alive throughout those dreary days. Indoor gardening is shown to improve symptoms of seasonal affective disorder (SAD), so when icicles are still clinging to the eves, you can be snug inside tending to tender shoots that will soon produce food or flowers. January and February are a good time to get this upgrade started, depending on your last frost. Whether you buy commercially made trays with a number of cells or create your own starter containers from recycle plastic milk jugs, soda bottles, or even simple DIY seed starter containers from toilet paper tubes , remember to label them, so you know what's growing inside.
Many flowers, herbs, and vegetables need an early start, and planting them before spring gives you plenty of time to ensure they're healthy and well established before you put them in the ground. If this is your first attempt at starting winter seedlings, there are loads of common plants you can try, from herbs like basil and parsley, vegetables, like celery and kale, and cold hardy flowers, like pansy and poppy. Once your seeds pop up, you'll be ready to roll the moment springtime weather returns. Just remember there's an important step you want to remember before you bring your seedlings outside: Make sure your soil is prepped and ready first.