DIY Projects That'll Add Extra Privacy To Your Backyard
We may receive a commission on purchases made from links.
It's hard to overstate the value of privacy, especially when we're relaxing at home. Unfortunately, humans are naturally curious creatures, and if allowed to do so, many will happily peer through the pickets to see what their neighbors are getting up to. This isn't always a bad thing, and we're not for one second trying to say you have something to hide. It's just that such prying eyes can feel a touch invasive, and knowing that somebody is watching what you're up to can make it difficult to relax.
With this in mind, many homeowners find themselves seeking ways to make their yards, porches, and gardens more private. There are some obvious ways to achieve this, like installing tall fences. However, larger projects like this typically come with a matching price tag, especially if you add the cost of a professional installer onto the already-expensive bill for the materials. Don't worry, though. There are plenty of cost-effective ways to DIY a more private yard.
For example, you can easily add height to shorter walls with readily-available and — crucially — inexpensive items like shipping pallets and garden trellises. Those with a green thumb can train climbing plants or espalier-style trees to obscure neighborly views through loose-weave fences, and if you're feeling particularly crafty and dream of enjoying the sound of water in your garden oasis, it's entirely possible to turn an old glass table into a privacy fountain. Depending on your DIY skills, there are plenty of ways to close off your yard from the street.
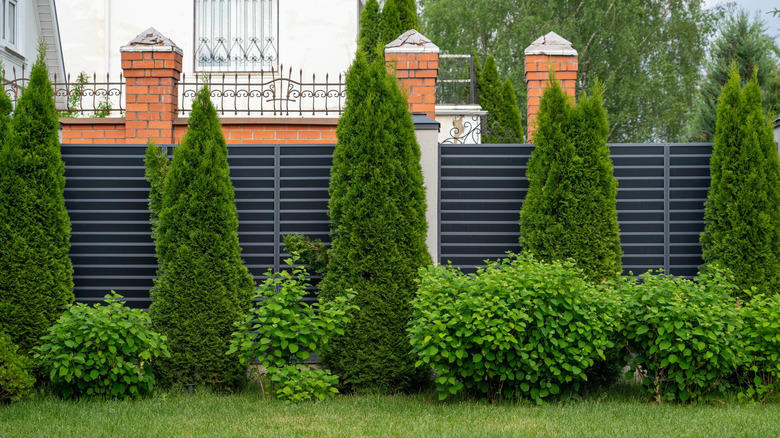
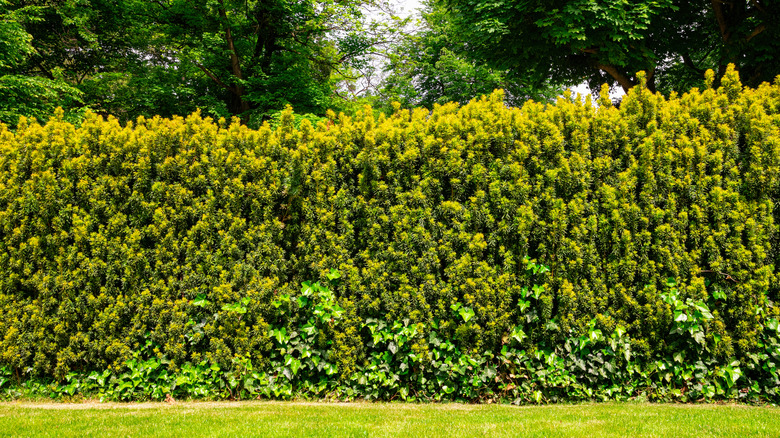
Build and grow a living wall

One of the easiest ways to add extra privacy to your garden is to use nature to your advantage. A living wall helps seal off any viewing holes along your fence line, and it has the added benefit of providing plenty of visual interest to your yard. In fact, growing hedges or grasses along your fence line is a clever way to add privacy to a chain link fence. Another plus? Certain plants can attract a diverse array of birds and pollinators, helping to transform your exposed yard into a private and biodiverse sanctuary that only you can see and enjoy. The easiest living wall involves planting a large number of flowers, herbs, or other plants in a pre-made kit that looks sort of like rows of seedling modules set on their end.
To bring this idea to life, source some sturdy vertical planting modules, screws (and a screwdriver), wood battens, and some brackets on which to mount the modules. You will also need some cable ties to secure the brackets to the trays (if your module kit doesn't come with them), plus a drip irrigation system to keep everything well watered. Then it's just a matter of adding the flowers, herbs, vegetables, or annuals of your choice. In all, the project should take an afternoon to pull together, and once it's ready, you can position it strategically to block your neighbor's view.
Turn an old glass table into a fountain wall
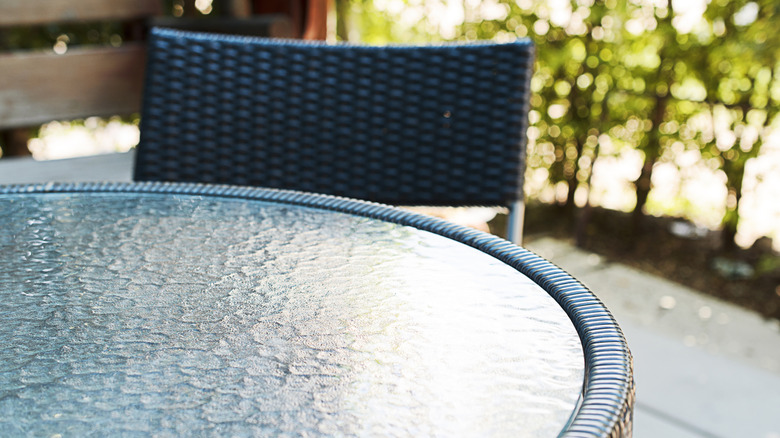
If you've been looking for head-turning ways to add water to your garden, but you're worried that the heads most likely to turn are the prying neighbors', then why not solve both problems at once with a DIY fountain wall? There are several ways you can do this, but one of our favorites was covered by Central Texas Gardener: Bringing the idea to life using an old glass tabletop. Glass makes the perfect surface for cascading water, adding to the feature's ability to catch the light, and since it's see-through or translucent, it doesn't block out natural light. It's also a superb way to upcycle a rusty old patio table (if you don't have one, you can often find outdoor glass tables free on neighborhood social media sites).
To build your glass table fountain wall, you'll need a few key materials. The first is a container to serve as a water reservoir. You'll also need a way to feed water to the top of the table. There are plenty of systems available for this, however, the easiest and most versatile way is with a submersible solar-powered pump and tubing kit, like the one from Poposoap. These don't require mains power, and can be used pretty much anywhere that receives sunshine. You'll also need to create a base to securely support the table. This could easily be achieved by sinking metal bars or wire shelving into the ground and slotting the table between them, thus preventing it from tipping over. Alternatively, if you're handy with a welder, you could fashion a wire frame and anchor that into the ground to keep the table upright. Cover the base with decorative pebbles, leaving access to the pump for maintenance.
Extend an existing wall with a trellis, lattice, or pallets
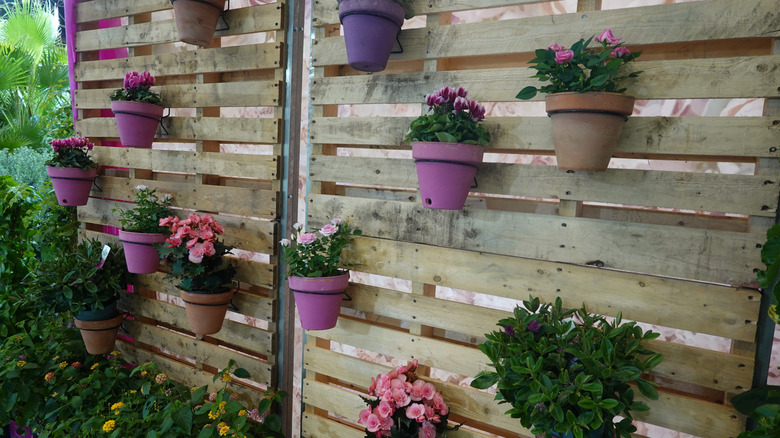
If your patio or deck has a low wall around it and you'd like to extend it vertically to interrupt your neighbor's sightlines, you needn't hire a contractor. Instead, consider doing it yourself with a wooden trellis or old pallets (if you live under an HOA, be sure and check regulations before doing this DIY). Each offers the chance to install plants and thus turn your wall extension into a growing wall, however, each also has its own unique requirements.
With a trellis or garden lattice, one option is to fix it on top of the existing wall, also called a wall-mounted garden divider. In fact, extending your deck railing with garden lattice is a DIY deck upgrade that adds privacy without blocking light. To make this easy, fix them first to wooden or plastic troughs, which can also serve as the soil for growing your chosen plants. Alternatively, you can affix trellises to wooden posts erected along the fence. Either way, you want a little room between trellises and fence where they abut.
To extend your wall with a pallet, you'll need some weed membrane and a staple gun. With the pallet turned on its end, simply staple the membrane in place between the top and bottom back deckboards running across the underside of the pallet, turning the space between them into modules for potting soil. Alternatively, you can hang planters off the front deckboards. You'll find this type of planter is perfect for both herbs and flowers, adding visual interest, herbaceous fragrance, and privacy to your garden patio. It's a good idea to seal and stain or paint the pallets, so they look nice longer, don't fade, and stand up to the weather.
Hang curtains to screen your neighbors' view
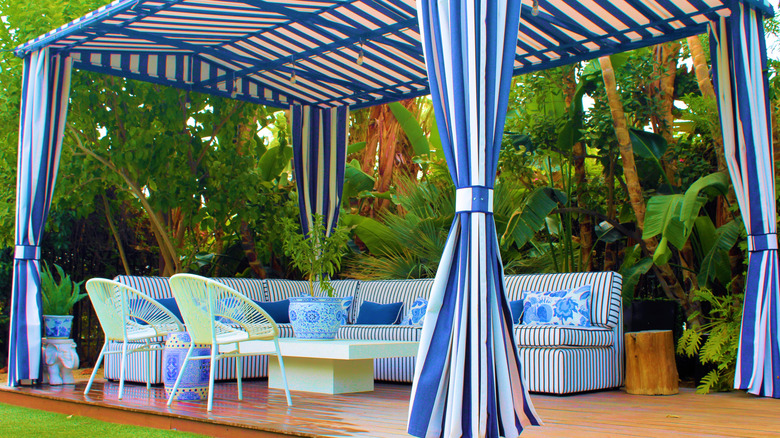
This idea is another easy win, since it requires little more than curtains and a pole on which to hang them. You will need to ensure you have two stable surfaces in order to fix the curtain pole in place, like the beams of a pergola or gazebo. You could also fashion for yourself a metal or wood frame. You could even make a portable frame or one that can be dismantled with the seasons. You can also hang your curtains on tension wire, although you'll still need stable structures on which to fix it. This trick is geared more towards specific outdoor activity spaces, like a patio, deck, gazebo, or a distinct seating platform in the yard.
However you choose to hang them, one of the most important things to consider is the fabric of your curtains. Acrylic, polyester, and PVC are all good choices. An affordable pre-made option are the Sun Zero Sailor indoor/outdoor UV protectant grommeted curtains, which run about $13 per panel at Home Depot. You can also DIY a set of drop cloth curtains to bring privacy to your patio. Avoid interior-grade fabrics, like cotton or velvet, as these are unlikely to stand up well to the rigors of the weather.
Build a brick barrier
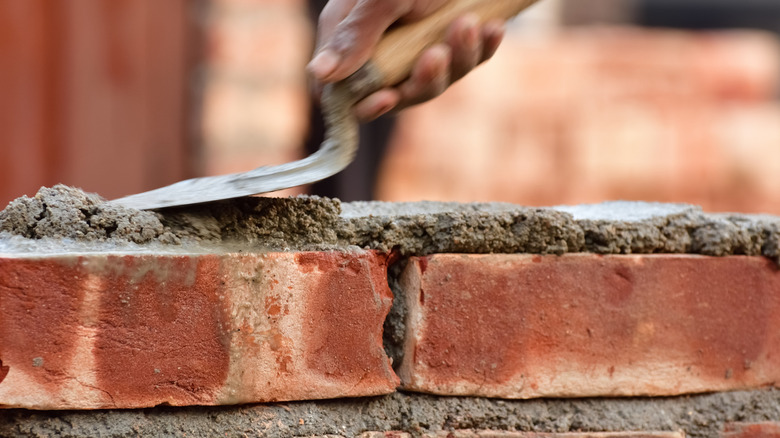
If you have the skills and experience to build a wall, or you're a firm believer that there is a first time for everything, then it's perfectly possible to build a brick barrier to add some privacy to your yard (again be certain to check local building codes and HOA regulations). When building with brick or stone, be extra diligent about safety if kids or pets play in the area. You needn't build a full-height wall, although that's certainly an option. It may be easier to build a low-level wall, then use that to mount a trellis, lattice, or wood-pallet planter/dividing wall.
Whichever way you decide to go about it, it's crucial you build your wall properly. You'll need bricks and a trowel, plus a spirit level or some string and a line level to keep things nice and straight. A club hammer and a brick bolster will help if you need to cut bricks to size, and you'll need mortar to keep them in place. For best results, make sure there is a solid foundation laid down — ideally concrete. The foundation should be around 10 inches wider than the finished wall, and around 8 inches deep. With that in place, begin building the wall row-by-row, pressing the bricks into around half an inch of mortar. It's best to build each layer inwards from the corners, keeping the ends, or pillars, of your wall one course ahead of the rest.
Strategically plant bamboo

Bamboo, or running bamboo (Phyllostachys spp.), grows incredibly quickly, and it will happily grow much higher than your neighbors' eyelines. This makes it a superb choice for planting in areas where you'd like to enjoy some privacy but can't afford to have a dedicated structure installed. Just know that it's not without its drawbacks. For example, some types, namely running bamboo, can spread further than you'd like them too. What's more, they'll do it very quickly.
Clumping bamboo (Fargesia spp.), as per the name, tends to clump rather than "run," and it doesn't usually spread too aggressively. This would be a great type to add to pots or smaller areas where only a small portion of your boundary needs to be screened. For larger areas, running bamboo might be more effective. In fact, provided that you manage it correctly, it's a great way to achieve lots of privacy in a relatively short time. In order to prevent it from getting out of control, make sure that you sink a rhizome barrier.
Rhizomes are the horizontal, underground root systems that plants like bamboo use to naturalize themselves. With bamboo, they can spread a long way underground, often leading to shoots appearing on the other side of the garden! A root barrier — made of metal, concrete, or flexible high-density polyethylene plastic — can keep this from happening, keeping the bamboo firmly where you want it. Sink the barrier at least 24 to 30 inches deep, and ideally angle it outward. As always, check HOA regulations before you plant, and also check to see if your state or community considers running bamboo invasive, and what regulations, if any, may be in place.
Dense evergreens can shield you from view
If you'd prefer something that's unlikely to take over your yard with less rigorous management, then another natural way to screen your yard from your neighbors' view is to use screening plants like conifers. Like bamboo, these types of trees and shrubs can provide year-round privacy. Also like bamboo, it's important to choose the right type. Choose the wrong type, and you could be dealing with a 50-foot tree in the future, where you just wanted a bit of alone time, which is why you might reconsider planting certain fast-growing trees, like the Lombardy poplar.
Arborvitae (Thuja) and Leyland Cypress (Cupressus × leylandii) are both great choices, each bringing dense growth (and thus plenty of privacy) to your garden. These particular trees also provide shelter for birds, especially in the winter when such cover is sparse. Leyland Cypress is also a fast-growing, lush evergreen that will add privacy to your yard in no time (though it's not as aggressive or as uncontrollable as running bamboo). When planted tightly in rows along your boundary line, trees like these also help to buffer the wind, and since they're evergreen, they'll continue to bring lustrous color to your yard long after your summer beds have fallen fallow.
Train vines to screen your fence
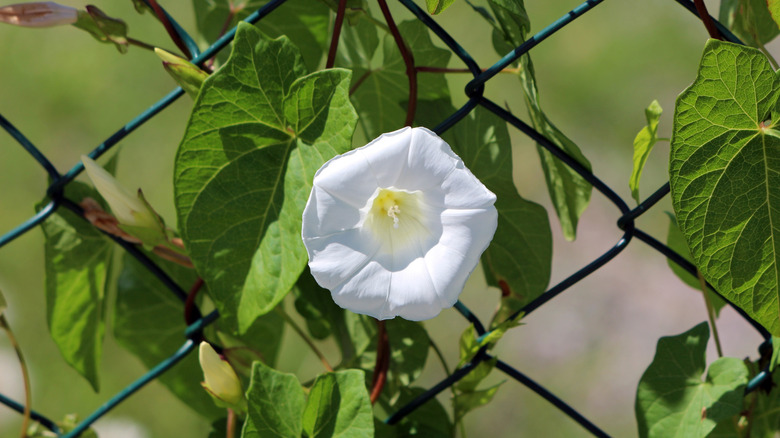
This idea is similar to building a growing wall, but relies upon the natural proclivities of vines and other climbers and your existing fence. Now, before you go ahead and plant a bunch of honeysuckle or crossvine, it's important to determine if your fence is up to the job. Vine-type plants like clematis and Chinese wisteria are superb for bringing natural privacy to your garden (as well as a distinct level of colorful interest), however, their roots and shoots are also quite rough. We don't mean texturally; we mean that they're strong and forceful. In other words, they don't always play nice with fencing. For example, Chinese wisteria generally isn't grown on wood fences, as it can essentially tear them apart over time.
Even stronger fences are at risk of joints being compromised as vines force their way through them. Metal fences are usually fine, particularly those with an open structure and plenty of sturdy posts and rails for vines to weave around. If you don't have one of these, don't worry. It's still possible to train vines to screen your fence, but you'll need some additional materials to do it. Namely, you'll want a trellis. Installed just inside of, and a little separated from, your fence line, it'll provide the kind of frame that clematis, wisteria, and other climbers need, without adding undue stress on your actual fence. In addition to matching the vine to the fence, you'll want to make sure it's planted to thrive: Is your fence east or south facing? Is it exposed to or protected from extreme weather? A little research goes a long way.
Climbing plants add privacy and shade to your pergola
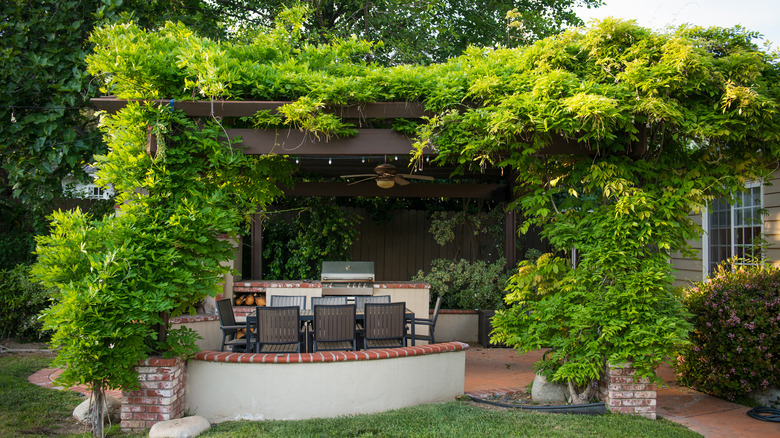
There are plenty of climbing plants that can add shade to your pergola, but privacy is the goal, then choosing the right one is key to shutting out prying eyes. Some of them grow with thick, luxuriant foliage — precisely the kind of dense growth that envelops you and your guests from view. Some are also excellent plants for pollinators, welcoming an array of friendly critters like bees, butterflies, and even hummingbirds.
Clematis (Clematis) and honeysuckles (Lonicera spp.) are both excellent choices. Both can be trained to wind their way around the beams of your pergola, although if you want to ensure full coverage, you may need to consider fixing a trellis between beams. Without it, they may simply climb the beams and leave the gap between the beams exposed. Finally, if you intend to use your pergola year-round, then consider evergreen climbers, like Henry's honeysuckle (Lonicera henryi). This particular species also grows quickly, reaching a height of up to 26 feet in as little as two years.
Place your container garden in strategic spots
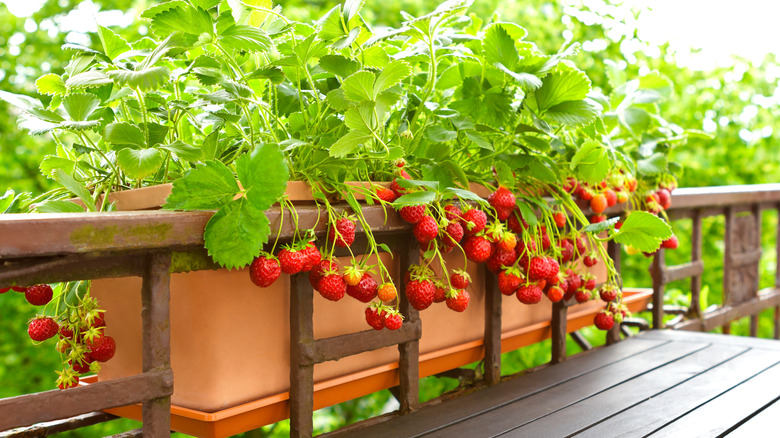
If extending your deck or porch railing with a trellis or a pallet planter is a no-go, you can use container planting to your advantage to dissuade inquiring eyes. In fact, that low wall is perhaps the perfect spot for a regular container garden. To maximize its privacy potential, layer it with tall pots agains the rail with shorter pots closer to seating and activity areas. And don't forget the top rail: Planters that fit over or attach to the top rail (also called deck railing planters) can create a beautiful, yet opaque, border detail.
Once you have your pots configured, you'll need to source the best flowers for your pots and containers. This largely depends on determining which USDA plant hardiness zone you live in, as well as the amount of shade or directsunshine your spot provides. Generally speaking, the best plants for privacy are those that grow either tall, or dense and bushy. Gardenia or Cape Jasmine (Gardenia jasminoides), with its evergreen foliage, is a good choice, as are thick grasses like Maiden grass or Chinese silvergrass (Miscanthus sinensis). While you're at it, consider planting trap crops, like nasturtiums (Tropaeolum). These will help keep annoying insects like aphids busy and away from your desired plants, as well as attract those same insects' natural predators. You could also add in some natural pest-control plants like Chrysanthemums (Chrysanthemum spp.), which are thought to deter bugs like mosquitoes.
Use garden mirrors to your advantage
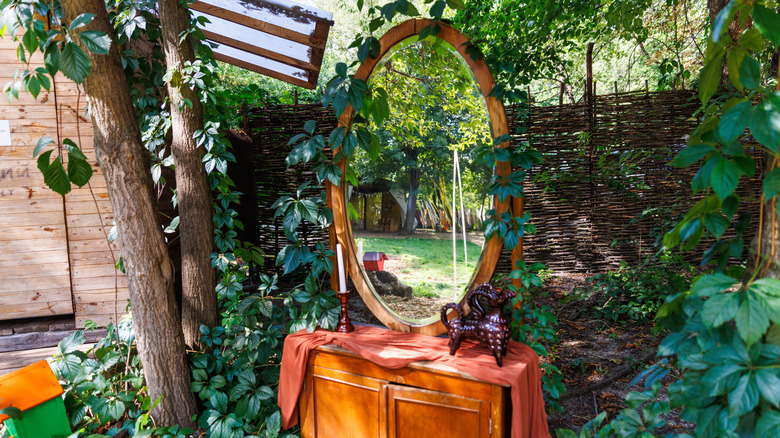
While they're often thought of as reserved for home interiors, mirrors can actually be surprisingly useful in the garden. For one, they're a superb means of giving the illusion of more space — handy in the cozy corners of your garden. They can also be used to spread light, helping to illuminate shady spots.
Perhaps the most useful way to use mirrors, however, is to afford yourself some privacy. To do this, you'll want to position the mirrors in strategic spots in order to break up your neighbors' lines of sight. It's less about blocking a view than creating a distraction. Set it in the flowerbed in front of the porch or against a fence to reflect foliage, grass, or a decorative architectural element, or to play with the boundaries between earth and sky.
However you choose to use mirrors in your garden, do it carefully. While they can help illuminate darker corners and improve your patio's privacy, mirrors can, if placed incorrectly, potentially lead to fires. Such incidents are rare, however, if they reflect and focus sunlight towards flammable materials — like garden furniture, fence, shed, or a pile of dry leaves — combustion is possible. You also don't want the mirror to shine directly into your (or your nosy neighbor's) eyes, nor frighten birds grabbing a drink at your birdbath. Regularly check where the reflection is landing, as the sun's path changes from day to day.