DIY Fountain Ideas You'll Want To Try Out In Your Garden
We may receive a commission on purchases made from links.
Water fountains are a worthy addition to gardens of all shapes and sizes, enabling homeowners to turn their yard into an area that truly helps them to relax. You might be hoping to attract local birdlife, or perhaps you feel calmer and less anxious in the presence of running water. If the latter sounds familiar, that's no surprise. Studies have shown that the sound of running water can contribute to a more relaxed state of mind, enabling you to recover from stress. In the context of a garden, this can really help you to unwind at home, especially after a long and busy week at work.
The best part, however, is that it's easy to add a DIY fountain to your garden. What's more, provided that you've assessed the potential drawbacks of installing a fountain, then you'll find there are plenty of ways to make one. Some of them are quite simple, too, especially if you have an existing water feature. Even if you don't already have a water feature, as long as you're relatively handy when it comes to DIY, you'll find that a few basic pieces of equipment, such as a submersible pump, filters, and hosing, are all you need to bring the dulcet tones of water into your garden. If you're in need of inspiration for your homemade fountain project, from simple DIY birdbaths to Japanese-inspired water features, then this guide is most certainly for you.
Make a homemade birdbath
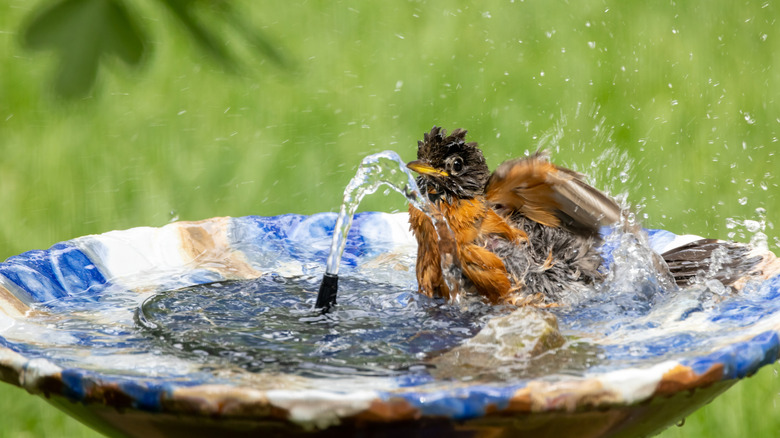
There are lots of ways to give the birds in your area a drink and a place to bathe. Since birds love running water, a fountain-style bird bath is highly recommended. You could opt for a DIY glass or plastic hummingbird feeder if you want to attract a few flashes of iridescence into your yard. Alternatively, you could turn your chip-and-dip bowl into a birdbath, or you could find a shallow dish — around 30 centimeters in diameter with a depth of no more than 10 centimeters — and use it to create a fountain that keeps your birds' H20 flowing.
To bring the latter idea to life, you'll only need a couple of hours, plus some essential fountain materials. As well as the dish, you'll need a submersible pump and tubing along with any other apparatus that the pump's instructions indicate. You'll also need a large container to act as the reservoir, a plastic bowl to serve as the bath, as well as some plastic mesh from your local hardware store. Once cut to size, the mesh will effectively form a lid over the reservoir, providing a platform for the actual bath.
With some holes drilled into the bath bowl (for drainage, as well as to feed the tubing from the pump), simply place the bowl on the mesh, place a coin in the bath to slow the growth of algae, and then find a home for your new fountain. Ideally, place it in an area that'll provide birds an easy dive to cover should they feel threatened. Try to keep it in sight of your house or outdoor seating area, too, so you can enjoy the fruits of your labor.
Give new life to an old barrel
Rather than throwing it out or leaving it to rot, why not turn an old barrel into a rustic water fountain? This is one of the easier ideas in this guide, and at its most basic, all you really need to do to achieve running water is fill the barrel with H20 and install a submersible pump and fountain. However, it's important to consider which pump is best for your feature. For example, if you're only planning to incorporate a few aquatic plants, then a solar pump should be sufficient. However, if you're planning to put fish in your barrel, then it's worth assessing how reliable a solar pump will be when the weather is cloudy. Fish need clean, well-oxygenated water. Without a reliable pump and filtration system, sludge can easily build up and draw oxygen out of the water. What's more, in the summer, a failed pump can lead to fish death in as little as 24 hours.
To help further ensure the wellbeing of your plants and fish, it can be a good idea to line the barrel with a pond liner, as this will help to prevent any chemicals in the wood from leaching into the water. And to get the most out of your aquatic planting scheme, consider stacking some bricks beneath the water's surface. Stacks of different heights can provide platforms for plants to grow from, adding multi-tiered depth to your fountain's planting scheme.
Create a fountain with an old teapot
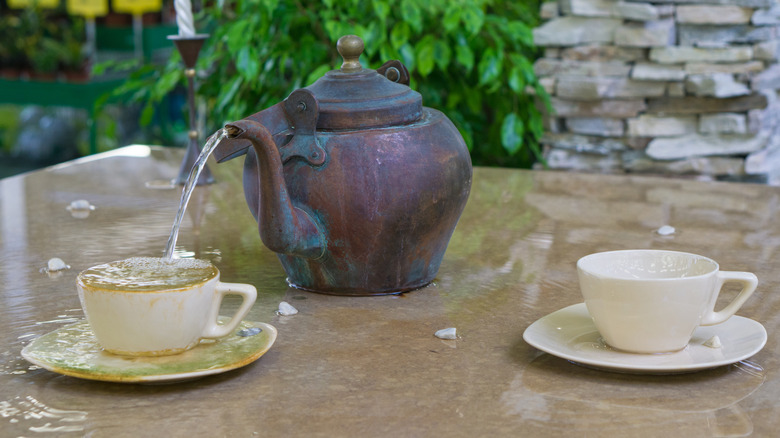
With just a few items, including a pump, some tubing, a bucket, and some metal pipe, it's easy to turn your old teapot into a rustic water fountain. You can be as creative as you like with it, too. For example, if you have a few tea pots, you can easily mount them at different heights, setting their spouts so that they cascade into one another before emptying into a reservoir beneath.
In any case, you'll need to fit a pipe or tubing into the base of the top-most pot. This can easily be done by drilling a hole into its base, and the pipe or tube that fits into it will be used to fill it with water. Depending on your design, using a pipe could also help to "suspend" the teapot above the reservoir. Regardless of how many pots you decide to incorporate into your design, one way to get more out of your fountain is to install a bowl beneath your bottom-most teapot and effectively turn it into a bird bath. The bowl should be narrower than the reservoir below to ensure that all of the water feeds back into the system, and if you want to encourage local birdlife to keep coming back, then adding some rocks to the bottom of your birdbath can help to make it more comfortable.
Create a solar fountain with a flower pot
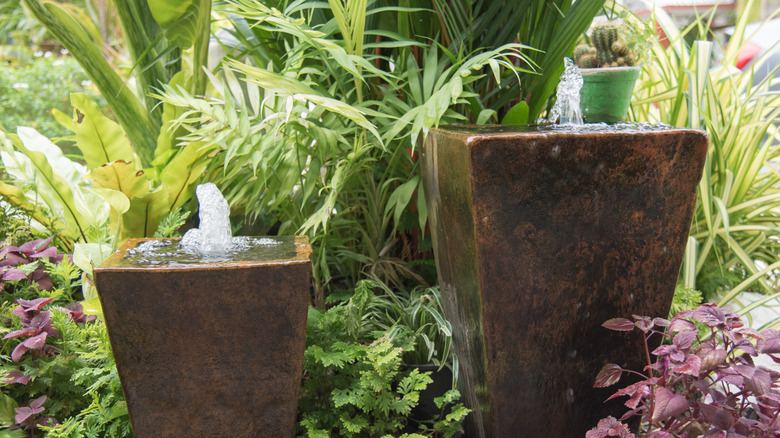
Another easy win for those who want water, stat, is to take an old (but intact) flowerpot and make it fit for a fountain. It needn't take more than a few hours, and the equipment you need is fairly minimal. What's more, because this idea is powered by a solar pump, you can place it anywhere in your garden that receives sunshine.
To get started, you'll need to acquire a submersible solar-powered pump and fountain kit. You'll also need a large container or flowerpot, and if your chosen vessel has a drainage hole, then you'll want to add some pre-mixed cement to your shopping list. The cement will be used to plug the drainage hole — just be sure to only apply the cement after you've installed the pump and fountain! The only other material you might need to consider is a liquid water wood sealant, especially if your container is made from a porous material like wood or terracotta.
Armed with the above list of materials, you'll be amazed by how quickly you can elevate your patio with a DIY fountain. If you're already set on creating a fountain, then you'll need to buy yourself a pump anyway. And since you probably have a pot and perhaps some wood sealant on hand already, this DIY fountain idea could well be one of the best if you're on a budget.
Find a new use for an old kiddie pool
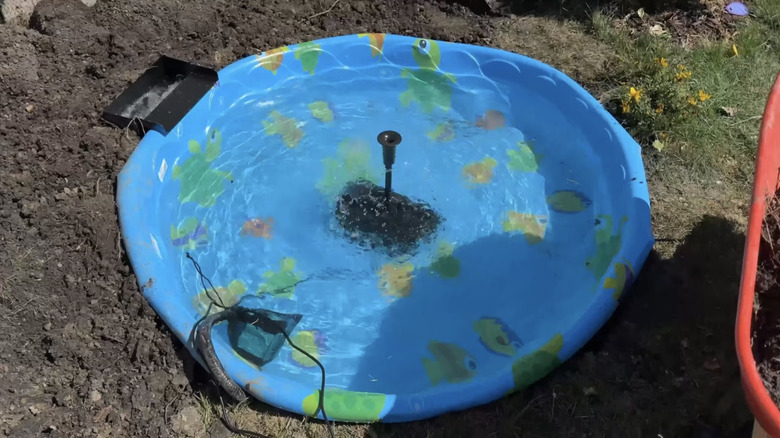
When your kids reach the age when they're too cool for a pool, instead of throwing out their old favorite yard toy, consider transforming that kiddie pool into a DIY fountain. Another one of the easier ideas in this guide, this project from Tech TRX on YouTube makes the most of the fact that, with a kids' pool taking up space in your garden shed, you already have a ready-to-go reservoir. All you need to buy is a submersible pump and fountain kit. Now, if you opt for a solar-powered one, then you could, theoretically, just place the pump in the pool, add water, and turn it on. However, to enjoy a fountain that feels more "intentional" as part of your landscape, it could be worth going the extra mile and digging a spot for it. This is especially true if you'd rather avoid a gaudy blue, green, or yellow pool marring your garden's aesthetic.
If this sounds like a better plan, then in addition to a pump, you'll also need to arm yourself with a shovel. Flipping your pool upside down, you'll need to score around its edge, like a stencil, which will mark the area that needs to be dug. With that done, you can simply dig the hole and sink your pool into it. Take your time with this, and try to ensure that once fitted, the pool's edge rises slightly above the ground. This will help to prevent water from spilling out, while stopping dirty groundwater from running in.
Make use of leftover patio pavers
If you're taking your landscaping to the next level with a DIY paver project, then you may well find yourself with an abundance of leftover pavers that you don't quite know what to do with. But don't worry. Those surplus pavers can easily be used to create a DIY fountain, and since you already shelled out for those, all you'll need to buy to turn them into a fountain is a submersible pump and fountain kit, plus a container for your water. You'll also need a shovel, although you probably have one of these already. Finally, while not strictly necessary, you could also grab yourself some cement to ensure the final build is strong and likely to last.
With your water container in hand, look for a likely spot in your yard — ideally one where a fountain is most likely to enhance your outdoor enjoyment. Next, score the ground using your container's rim as a stencil, before digging it out to the right depth. Just as you would with a kiddie pool fountain, try to make sure that the lip of your container sits just above ground level, to prevent both outward and inward spillages. Next, with your hole dug, sink the container into the ground, and begin building your paved feature around it. The actual fountain can be achieved two ways here; you could build a low wall around your container and simply submerge a fountain in the container. Alternatively, you could build a high wall around the back of your container, then thread some water hoses around the back and to the top of your terrace, so that water cascades down the pavers and back into the reservoir.
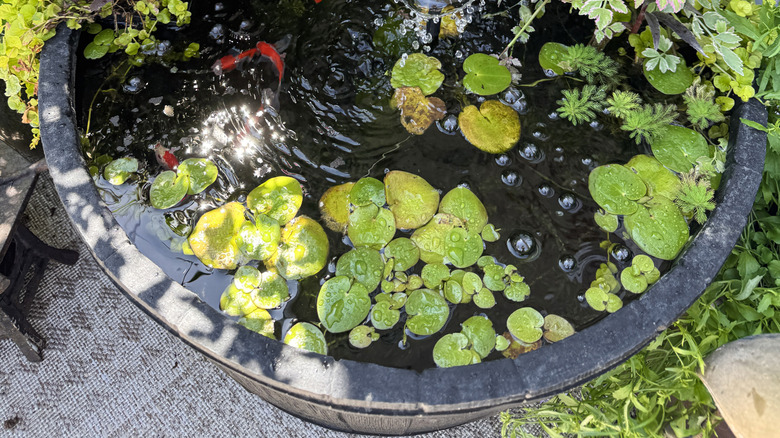
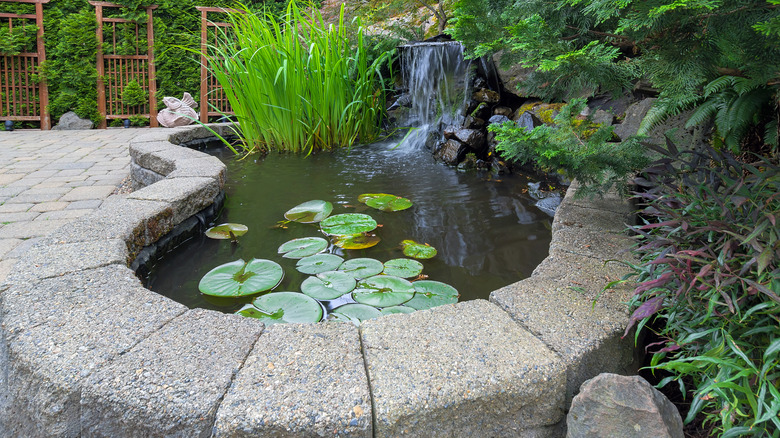
Turn an existing pond into a bubbling oasis
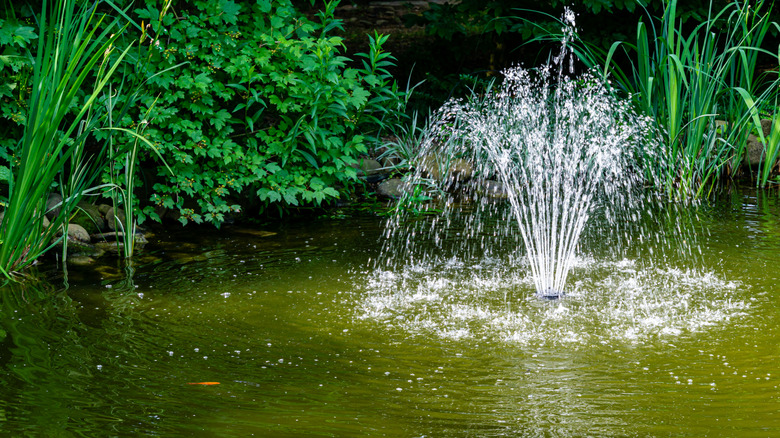
If you already have a pond, whether or not it already has a pump and filtration system fitted, you can quite easily add a fountain effect to it with the addition of a submersible fountain. The benefits of doing so are three-fold. The first is that standing water (water that isn't moving) represents an attractive spot for mosquitoes to lay their eggs, and by adding a fountain, you can convincingly persuade them to look elsewhere. The second is that, while simply gazing at water has several potential health benefits (including reduced heart rate and lower blood pressure), those benefits are compounded by the acoustics of running water. The third? If you have birds in your local area that you'd like to welcome into your yard, then they're sure to appreciate the time you took to get your pond-water moving.
Now, depending on the depth of your pond, you may need to submerge a stand for the pump and fountain to sit on. This is easy enough to achieve, as you can simply place some bricks at the bottom of your pond to form a plinth. Just be mindful of how high you mount the fountain. If your pond lies in a spot that receives a lot of wind, then it could, over time, blow water away and into your garden, leading to water loss.
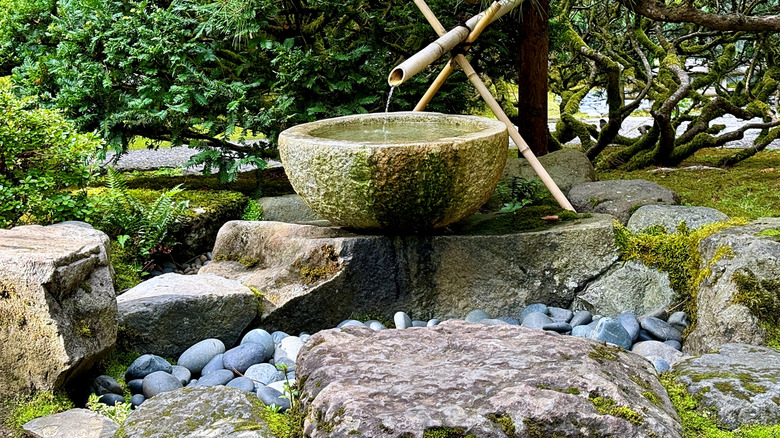
Craft a shishi-odoshi fountain
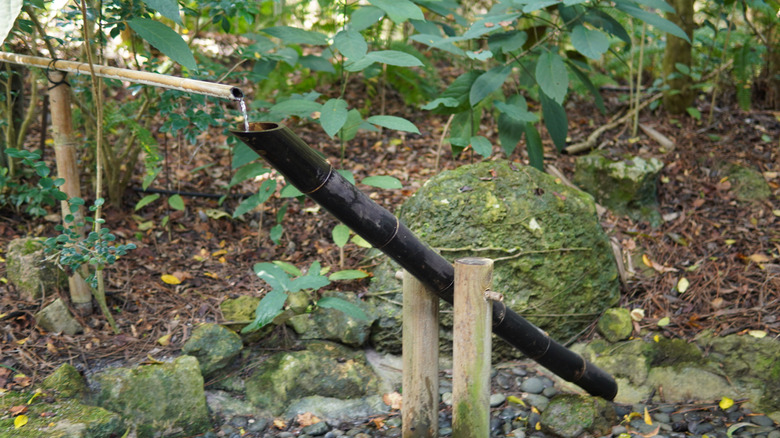
This Japanese style of bamboo fountain is one of the most head-turning ways to add water to your garden. It features a static bamboo spout, and an opposite mounted piece that pivots. The pivoting piece of bamboo is filled by the spout, until the weight of water causes it to upend itself. The design usually features a stone as well, which is placed beneath the moving section. When the moving piece eventually pivots under the weight of water, it lands with a "donk" on the stone, making a sound that's perfect for deterring deer.
Compared to some of the other DIY fountains featured, the process to create a shishi-odoshi is a little more involved. It's not complicated, however, and while the list of required parts might seem long, it's quite an intuitive type of fountain to put together. Firstly, you'll need a container for your water reservoir, plus a submersible pump and tubing. A long length of bamboo can be cut into three pieces (one each for the upright water pipe, the spout, and the pivot-mounted "donker"), plus some sealant and a cap to prevent leaks on the pivot stick. Two wooden posts will serve as the frame for the moving piece, and you'll also need a metal rod that's long enough to pass through all three while allowing for a smooth pivot. As for tools, a power drill and a spade will do most of the heavy lifting. A tenon saw will help to ensure clean cuts in your bamboo, while a rubber mallet will help ensure everything's sunk firmly into the ground.
Build a fountain wall
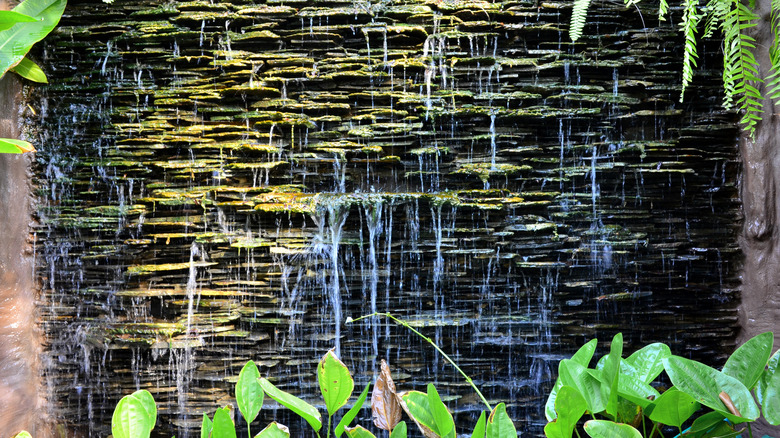
Elegant and serene, fountain walls can be purchased (or built) in an array of materials, shapes, and styles. If you'd prefer to make your own and happen to have an old glass table that you've been thinking of replacing, then you could even transform that into a homemade waterwall instead of sending it to the recycling center. Whatever you choose to make it from, be it a glass table or stone walling, fountain walls are great for adding interest to an otherwise-unloved corner of your garden. They can also be placed strategically to provide some privacy, effectively blocking your nosy neighbor's view of your seating area. If you're feeling really creative and like to enjoy your garden after the sun sets, then it's possible to add LED lighting behind the water, too, bringing further interest to your garden after dark.
Given the taller nature of this particular fountain, equipping yourself properly is key. As well as your base structure (be that a glass table, a metal panel, or natural stone) and a sturdy stand, you'll need a water tank to collect the water. A submersible pump is also required to recirculate the water, and it's important to source one that's strong enough to push the water to your required height. Depending on the materials that come with your chosen pump, you may also need to source some extra-long tubes or pipes to direct the water. Finally, to keep your system shipshape, it's recommended that you add in a filtration system, which will help to keep out detritus and prevent blockages.
Build a simple rock fountain
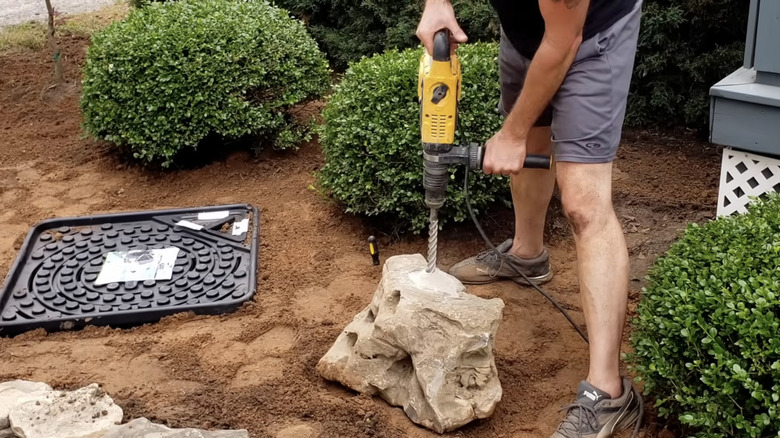
For a more natural look, there are lots of ways you can create a fountain out of simple stones. You could choose to stack them like a cairn, or, if your balancing skills aren't quite up to that, you could create a rock fountain using larger, heavier stones that don't need to be balanced. The important thing to remember when choosing your rocks, especially if you're sourcing them from nature, is that they're likely to look smaller in the vastness of the great outdoors than they will once placed in your yard.
Whichever style of rock fountain you choose, to keep the water cascading, you'll need to dig a hole for a reservoir to hold a submersible pump plus any further apparatus required to make it work, including hoses. It's also advisable to secure a sturdy, permeable cover for the reservoir hole — one that can support the weight of your rock. A filtration system could also be worth considering to keep the system clean and free of blockages, especially if the system will be tricky to access once installed. Finally, if you plan to use a single, large rock, then experts suggest drilling holes in it to provide easy passage for the water while keeping your tubing tidy. Just make sure that you have a drill that's up to the job and aim to use either diamond-tipped or diamond-core bits, as these are designed to cut through tough materials like stone.
Design a multi-tiered water fountain
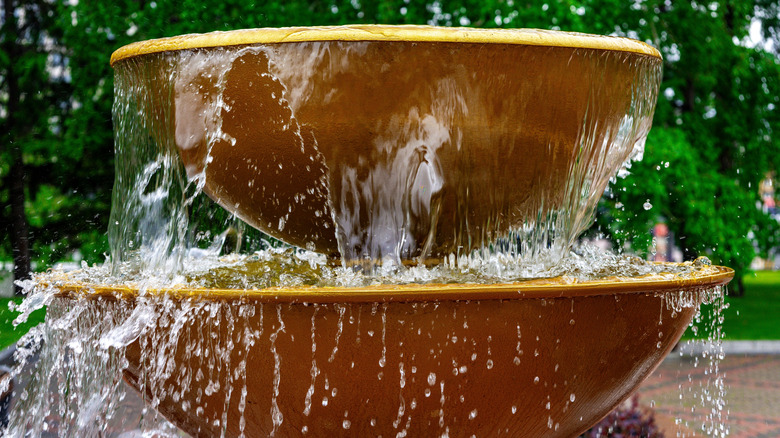
This idea for a multi-tiered fountain is incredibly versatile. You can use plant pots, metal bowls, or even plates to form the tiers. Even if you have a nest of outdoor tables that you no longer use, you could stack these on top of each other, provided that you can fasten them safely in place. It's really down to what you have to work with and how creative you're feeling.
Provided that you already have some vessels on hand to form your tiers (as well as a drill and a container that you can use for the reservoir) then all you really need to buy is a submersible water pump and some tubing. As for the tiers themselves, size is everything. In a three-tiered fountain, for example, the top tier should be the smallest, the middle should be slightly wider, and the bottom tier should be wider still. Note that the bottom tier should still be smaller in diameter than the reservoir, to prevent water from spilling over and onto the ground.