A Clever Way To Create Waterproof Storage Under Your Backyard Deck

We may receive a commission on purchases made from links.
Decks are a wonderful addition to any outdoor space, giving you a place to hang out and overlook your yard. Unfortunately, the space beneath a deck often goes unused. Because decks are not inherently waterproof, storing items underneath isn't always feasible. Even if you do manage it, sometimes it can lead to rot in the wood. If you are looking to create a deck that is waterproof and allows you to make the underneath usable while also keeping the wood sturdy, there's a great solution known as a membrane-and-downspout system, or simply an under-deck drainage system.
It's a great way to make a waterproof area so you can use it as a secondary lounging area or as storage and rest confident that you won't venture down there one day to find everything soaked and ruined. It may even help create a perfect way to store patio furniture during the off-season, or any other materials you don't need outside in the open all the time. It also works under both elevated and non-elevated decks, such as a DIY floating wood deck.
This method uses a membrane, downspouts, gutters, a staple gun, a utility knife, and waterproof tape. If you get a kit, like this Muzata Under Deck Drainage System on Amazon, then you will usually get the membrane and the downspouts. This system takes advantage of your normal deck frame. Before you put boards over the top, you will set up this drainage system. It works by creating a series of gutters and troughs to direct rain and safely expel it on the outside without damaging your frame or the boards on top.
How to use a membrane-and-downspout system
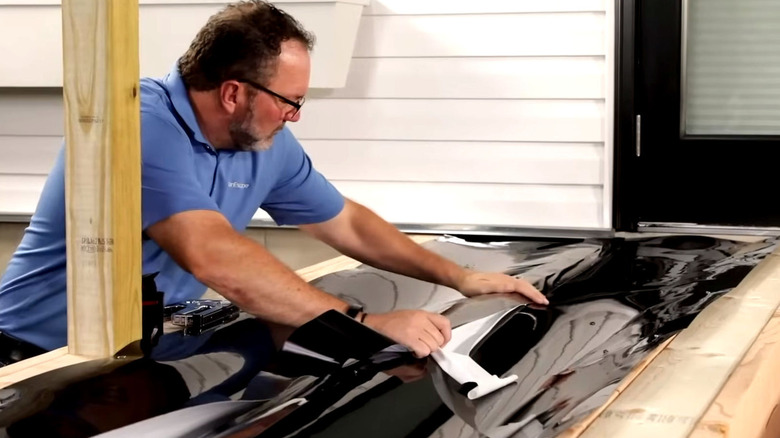
Before you go and buy a kit, you need to make sure you select the right size. The membrane is meant to go with your deck. Most decks have joists spaced 12 or 16 inches apart. Many systems fit either spacing, but it's important to confirm your joist measurements and that the product will fit. Some companies even offer options for 24-inch framing.
Once you have all the materials, it's time to get started. You'll start with the downspouts. Install them by cutting out the marked areas and stapling or screwing the pieces to the joists. These funnels are then able to drain into a standard house gutter. Next, you must install the troughs. First, acclimate the material by gently folding it in half or by letting it sit out at outside temperatures for a while. Depending on your deck's design, you may have to make some cuts and adjustments. Then, unroll the material shiny-side up, stapling on one side from the back corner to the spout and then repeating the process on the other part.
You should have a trough between every joist, and all the wood needs to be covered by the material. Make sure the troughs are angled correctly so the water heads down to the spout instead of the opposite way or staying still. When that is done, you will use waterproof tape to cover the seams between the troughs. It's this material that also helps to secure screws in place.
What to know before trying an under-deck drainage system

If the process feels too complicated, many professional contractors can install the system for you. Though this does add to the cost, it can help to ensure it's done right the first time, and potentially save you money and headaches. A major downside is that the system doesn't work with an already built deck. However, if you're looking to replace all the planks on your deck soon anyway, that is also a good time to try out the system.
Before you go jumping into this project, however, you need to understand the negatives as well. The first is that you don't have much room for mistakes. A wrong cut or imprecise installation can lead to leaks and structural issues later on. Though the individual steps are simple, there are a lot of areas where it can go wrong, including the tape, the trough slope, and the placement of the downspouts. Another drawback is that it doesn't work with all designs and hardware, so you want to make sure it actually fits alongside your other materials before purchasing everything. For example, if you're putting in a deck on a tight budget, the right material for you might not be compatible with this method.
There are a few other solutions if the membrane doesn't work for you. For a more elegant look, companies also offer under-deck ceilings that appear to be a normal roof, but funnel out water to keep everything protected. Waterproofing decking flanges can also divert and channel water, offering another potential solution. With careful planning, even a commonly overlooked space can become one of your yard's most useful features, giving your deck far more value than just what's on top.