

Say Goodbye To Traditional Birdbaths: Turn A Plastic Pumpkin Into A Fall DIY
We may receive a commission on purchases made from links.
As you go about getting your garden ready for the fall bird migration, you may be looking at updating or adding to the available water features in your yard and garden. After all, whether it be a birdbath or pondless water feature, one of the best ways to draw in birds to your backyard throughout the year is to provide them with a source of fresh water. At the same time, you might want to add some seasonal flair in time for autumn, which is tough to do with traditional, store-bought birdbaths. By turning a plastic pumpkin into a creative DIY water feature, you can actually accomplish both goals with one project.
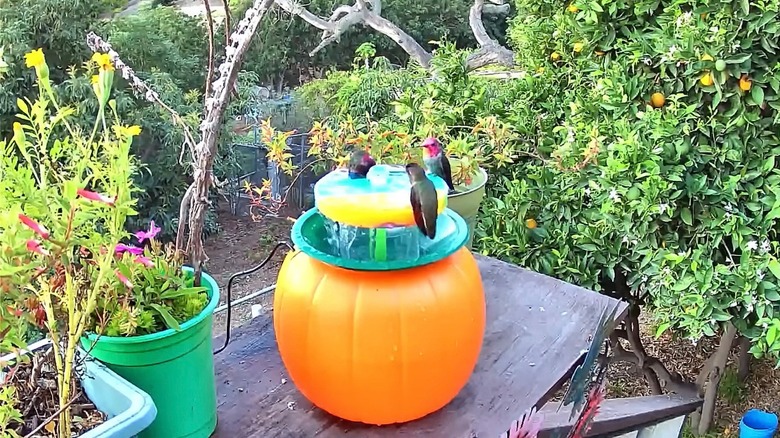
Of course, there is no shortage of DIY garden fountain ideas. However, the one circulating on social media from YouTubers Robbie and Gary Gardening Easy, incorporating plastic Jack-o-Lanterns, is a fun way to add some Halloween spirit while providing much needed hydration for migrating birds. Even better, once Halloween has passed, simply rotate your creation so the Jack-o-Lantern face is hidden, and you have a fall fountain to see you through the Thanksgiving holiday.
For this DIY project, you will need a waterproof plastic Jack-o-Lantern pumpkin, a sturdy plastic bowl, straws, and a small fountain pump. If you intend to place your birdbath in a part of your yard that doesn't have ready access to power, choose something like a Pulaco solar fountain pump or the same brand's rechargeable USB submersible pump. You will also need a pair of heavy-duty scissors, painter's tape, and either a drill and drill bits or a soldering iron. Depending on the size of the bowl and any platform you might choose — and the size of the birds that visit — this DIY may trend more bird waterer than birdbath. The choice is up to you.
Creating a fall-themed birdbath
Start by cutting the handle off the pumpkin. Make sure your plastic trick-or-treat bucket holds water, as not all do, since they are often designed as single-use holiday gear. Cut a notch at the top of one side of your bucket for pump cords to pass through. Use a drill or soldering iron to make a hole in the center of the plastic bowl for the tube, and several smaller holes around the base of the bowl, allowing water to drain back into the pumpkin's base.
Cut a section of tubing or a thick plastic or silicone straw long enough to reach from the pump in the bottom of the pumpkin and extend a few inches above the bowl. Place the straw over the nozzle on the pump, wrapping the nozzle with a layer or two of painter's tape before sliding on the straw for a tight fit. Once the pump is fitted with the straw, set it in the bottom of the pumpkin and place the bowl on top with the straw protruding through the hole in the center.
At this point, your pumpkin birdbath is ready to go, or customize this project further. Create a platform (or several) that sits on top of the bucket above the birdbath bowl, making the whole setup more attractive for hummingbirds, which prefer shallow water. The YouTube creator used a circular silicone bubble popper, but you could use a large plastic lid or plate. Or add pebbles to the bottom of the bowl as a handy perch for birds and bees. A larger cobble at the bottom of the bucket holds it in place in windy weather, or a sealed jar filled with battery-operated fairy lights set inside the pumpkin makes for fun illumination. You can even change up the color or theme: There are blue, purple, and black options, along with skulls, witches, and black cats available to personalize your new birdbath.