Don't Throw Away Empty Soda Cans: Use Them For Budget-Friendly Garden Markers

We may receive a commission on purchases made from links.
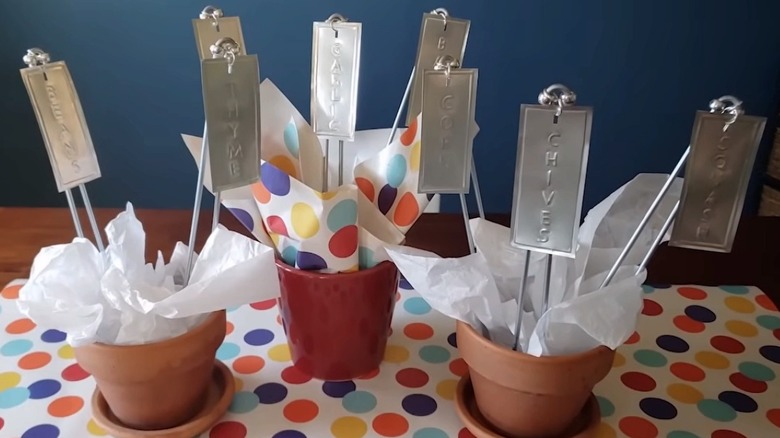
Empty soda cans are the type of thing that many people just toss into the recycle bin without a second thought, but those cans are actually craft-worthy gold. The aluminum in each can is fairly thin, which makes it especially useful for DIY projects. It may come as a surprise that a regular pair of scissors can cut that metal with ease, giving you a steady supply of aluminum to reuse around the yard and garden. Each can has enough metal in it to make at least a few garden markers for identifying plants. If you've ever forgotten what you planted and where, these markers can eliminate the issue. The names of each plant won't fade or wash off, either, because they're stamped or embossed onto the metal.
You'll need a metal stamping kit, such as the Owden Professional Steel Stamping Tool Set from Amazon, or if you'd like to make the letters freehand, a simple embossing tool does the job nicely. Some embossing tool sets include multiple tips, making it easier to create letters or decorative designs in different sizes. These markers could come in handy year after year, trying to remember where bulbs such as tulips have been planted. If you have an abundance of cans, they can also be used as plant pot filler to save soil or repurposed into simple safety alarms for a campsite.
Making plant markers from soda can strips
The first thing you'll want to do is rinse the cans thoroughly and let them dry completely before cutting them apart. To transform them into usable metal sheets, use a utility knife to poke a starter hole near the top curve of each can. Once the hole is large enough to insert scissors, cut around the can's perimeter in a straight line near the top to slice it off. Another cut straight down towards the bottom creates the ends of your metal sheet; then, just cut the bottom off as well. Smoothing the edges with a paint scraper or similar tool helps remove bends created by the scissors. Flatten the metal sheets, then cut them into strips as tall and wide as you'd like. Running a sanding block along the edges reduces sharpness, though wearing work gloves is still recommended.
To create stamped letters, test your tools to determine whether stamping from the back produces an embossed look or stamping from the front creates an indented one. Set the metal over cardboard on a block of scrap wood, then hammer the stamp down onto the aluminum strip. Repeat the process for each letter to spell out the plant name of your choice. For a freehand look, place the metal color-side up on cardboard and spell the words in reverse with your embossing tool.
Once everything is ready, make the tags into garden stakes by punching a hole near the top of each tag, inserting a jump ring, then attaching the ring to the top of a U-shaped landscaping staple such as these Oligei garden staples. Push the stakes directly into the soil wherever you direct sow seeds, and you're all set.