DIY An Elegant Planter For Your Garden Using These Dollar Tree Items
The selection of planters available at some garden centers and some nurseries is impressive, from the tiniest succulent pots on up to those behemoth planters that practically require a truck to haul them away. While it's fun to fantasize while perusing them all, it's a quick trip back to reality after glancing at their price tags. There's no need to shell out loads of cash for a plant pot that seems to suit your outdoor decor style. Instead, get the look of top-dollar decor with dollar store items and a little creative playtime. A basic Dollar Tree planter and a few other supplies from the same store will have you smiling your way to savings as you whip up your own custom-decorated planter.
Decoupage is the secret to creating a beautiful design on a simple plastic pot, such as Dollar Tree's Traditional Lawn and Garden Planter. If that particular planter is out of stock, choose another option that's smooth to the touch, as it's much easier to achieve the desired results with decoupage on a smoother surface. Pick up extras if you like so that you can upgrade another planter with a satisfying and stylish DIY. Dollar Tree also sells the Mod Podge Gloss Craft Adhesive that you'll need for this project. TikTok DIYer @thecraftessa chose a faux chinoiserie design in blue and white for her plant pot upgrade, but other styles can work just as well.
How to make an elegant planter
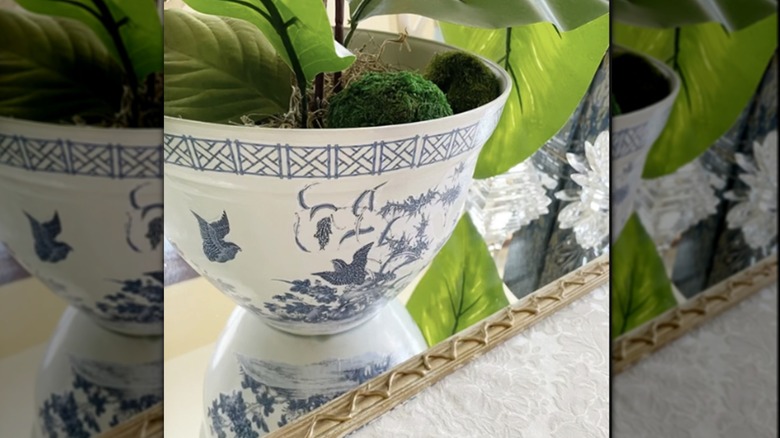
To achieve a look similar to @thecraftessa, spray paint your planter white if it isn't that color already. Choose a paint designed for plastic like Krylon All-in-One Adhesive Spray. Apply several coats. Then buy or print out a patterned artwork on paper — such as a pagoda scene in blue and white — for a faux chinoiserie look. Make sure the ink is dry for freshly printed paper, then coat the front and back with a clear spray acrylic sealer. Otherwise, the ink will smear when using Mod Podge.
Cut out your paper images and test-fit them around the outside of the plant pot. Once you're happy with the layout, use a paintbrush to apply Mod Podge around the planter. Press the paper in place and smooth it down to remove bubbles. Continue applying Mod Podge and printed images until the entire perimeter of the pot is decorated. Smooth everything out once again while the Mod Podge is still wet, then allow the pot to dry for 20 minutes or so. Apply three more thin layers of Mod Podge to seal the outside. It's best to use decoupaged planters where they won't get soaked from heavy rains, like on the porch. Adding an outdoor-friendly clear varnish or sealant can further protect from the elements.
For another fun planter to pair with your decoupaged pot, transform an old wine box into a planter. You could leave the wooden crate as-is or use the decoupage technique here if desired. If you're in the mood for more upcycling, these household staples are easy to repurpose into garden decor.