Restore Your Old Birdhouse With These Must-Try Tips And Tricks
We may receive a commission on purchases made from links.
Among all the simple hacks for attracting birds to your backyard, putting out a birdhouse feels as if it has the most permanence. Feeders and bird baths frequently need to be refilled and cleaned. Plants need pruning and watering. All the while, your birdhouse remains steadily perched right where you placed it. However, this doesn't mean you can ignore it forever. In fact, not performing some routine maintenance can lead to an infestation of insects or rodents, spread disease, and, eventually, the birdhouse becoming unsuitable or unsafe due to rot and/or structural damage, and a degrading or expanding of the entrance hole. Luckily, you can easily restore your old birdhouse with these must-try tips and tricks, which range from simple tasks like cleaning and painting to more complex tasks like replacing panels.
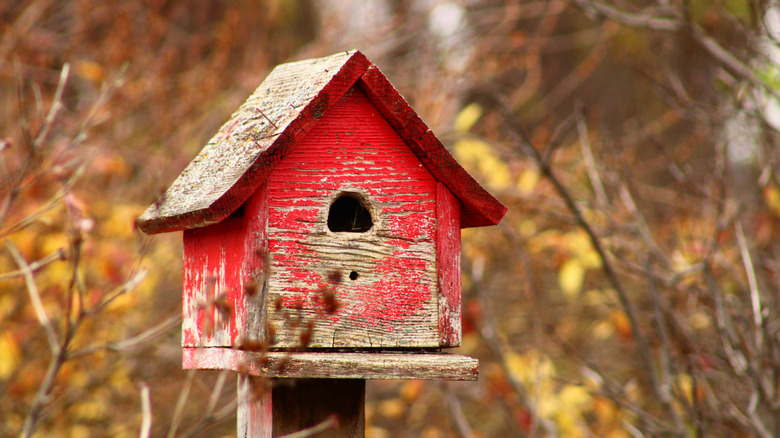
There are many culprits when it comes to the degradation of birdhouses. Weathering due to sun exposure, rain, and changing temperatures can result in rotten, warped, or cracked wood. In areas of high humidity, mold and mildew can form, resulting in additional issues. If your birdhouse is painted, sun exposure will fade colors. The very act of birds using the house can lead to wear and tear, particularly if they built a nest or had a brood in the house.
Regardless of what particular issues need to be corrected, the first step is giving your old birdhouse a good cleaning. This is typically best done during autumn, after all fledgelings have left the nest. Be sure the birdhouse is not being used, then remove it from its placement. Remove any old nesting material from inside, brush out the house, and wash the whole thing with a diluted solution of 9-to-1 water and bleach. Then thoroughly rinse and allow it to dry in full sun.
Repair and replace the wood on your birdhouse
While cleaning your birdhouse, inspect it for damage and make note of any repairs that need to be made. Small holes, cracks, or loose fitting pieces can be secured with non-toxic wood glue or putty. You can also add additional nails or screws to make sure the pieces stay together. Any rusted or broken hardware should be replaced, including nails or screws. If the house has a damaged perch, consider removing it, since it's a popular birdhouse addition you may want to avoid.
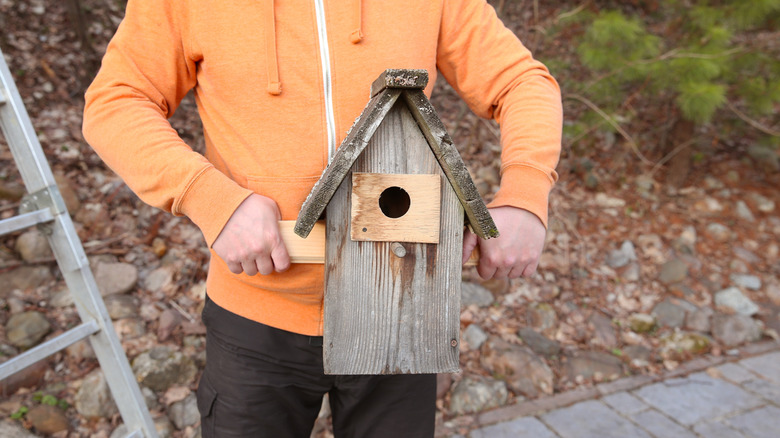
If you notice majorly damaged pieces of wood, those sections may need to be replaced altogether. Roof pieces are easy to replace, as they can be removed and replaced with a new piece of wood cut to the same dimension. For side panels or flooring, carefully disassemble the birdhouse in order to access that piece. Make note of how each piece goes together. It can be helpful to take photos as you disassemble and lay the pieces in order as they are removed. Then, using the old piece as a stencil, cut a new piece of wood to the exact dimensions and reassemble your refreshed birdhouse.
Pay particular attention to the panel with the entry hole. It is important to have the right size hole for your birdhouse. If the hole has been expanded due to weather, rot, or use, this panel may need to replaced. However, if the hole hasn't enlarged too much and the panel is still solid, another option is to install a patch piece of wood with the right-sized hole, or a Ripeng galvanized metal birdhouse guard or similar guard, which will prevent further damage and retain the hole's proper size.
Modify and paint your restored birdhouse

Once your birdhouse is repaired and put back together, it is a good time for any modifications you might want to make, such as adding drainage holes to your DIY birdhouse. After the modifications are complete, finish your birdhouse by painting or staining it. While a fresh coat of paint can just be applied over the existing one, it is really best to sand your birdhouse first. This removes any cracked or loose paint, evens the surface, and can get rid of a layer of weathered wood damaged by the elements. After sanding, wipe the birdhouse inside and out to remove any dust particles.
Before painting, make sure you select a non-toxic paint or stain. That way, you not only protect the wood from the elements, but also ensure birds aren't exposed to harmful chemicals from flaking paint. While you can use any color you choose, there are reasons you might want to consider painting your birdhouse green, such as giving it a natural look and camouflaging it from predators. Regardless of which color you go with, paint only the exterior of the birdhouse. Painting the inside not only exposes birds to the paint, it makes the floor slippery, presenting a potential risk, especially for the young ones.
After painting, allow the birdhouse to completely dry. Then, replace or update the hanging hardware and mount the birdhouse in the desired location.