Add Privacy To Your Outdoor Space By Repurposing Your Old Shutters

We may receive a commission on purchases made from links.
Privacy may not be easy to come by in your outdoor spaces. Whether you live close to neighbors or just wish to hide away from the outside world, a DIY privacy screen adds convenient coverage. Using old shutters you would otherwise trash, you can build a sturdy and easy-to-operate privacy screen. This screen, when finished, opens or closes easily to shield your space or let as much natural light in as you like. If you have been stumped for ways to add privacy to your porch, deck, or patio space, this DIY offers a simple trick that'll add more privacy to your backyard using a basic design and minimal components.
A few supplies is all it takes to bring a simple privacy screen to life. First, consider the size of the space you're shielding or enclosing. The size will determine how many shutter panels you will need. A long covered porch, with a tall opening from railing to roof, will naturally require more panels than a small patio a couple of feet wide. If you only have a few old shutters to spare, you might seek out more at yard sales or from neighborhood home improvement projects. If you have already chosen to repurpose your old shutters for a unique vertical garden, you can build custom shutters to fit your space. However, building shutter panels requires wood and basic carpentry skills. Finally, to pull everything together, you will need metal narrow cabinet hinges, corner braces, screws, and a single hook-and-eye closure.
Revamp shutters into a pull-out privacy screen
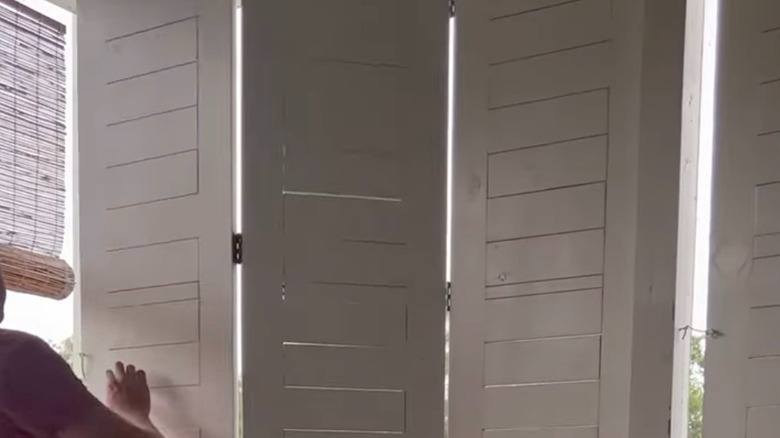
While you can always create brand-new shutters from scratch, this project becomes much simpler if you repurpose old ones. Instead of assembling shutters, start by laying out each panel and adding hardware. For the end shutter panel, screw on three corner braces. These braces, when attached to the posts of your patio or porch, give the entire screen stability. Two to three narrow hinges get spaced and attached between each subsequent shutter. The result is an accordion-like screen that can be pulled out to stretch across an opening or pushed back flat against a wall or post. Installing the finished privacy screen requires attention to detail to ensure even spacing. Add a hook-and-eye closure to the opposite patio post, and you can secure this screen against wind, people, and pets.
Consider customizing the fit and look to match your space's needs. For example, the length of the space you are screening might mean you create two separate privacy screens. When pulled from either direction, these screens meet in the middle for full coverage. Although it's not necessary, a light sanding and a coat of paint will give the entire DIY a fresh, cohesive look. Unless they have a timeworn patina that you want to capitalize on for your outdoor design, new paint can cover up imperfections and prevent old paint from flaking and shedding into your living space or yard. Also consider whether a shutter tieback or something like the Renovators Supply Manufacturing shutter dog is needed to hold your screen back when not in use. You can even pair this DIY privacy screen with other projects to better define your outdoor spaces, like a stylish slat roof to make a small patio feel bigger.