Transform Your Backyard Into A Relaxing Oasis With A DIY Waterfall

We may receive a commission on purchases made from links.
If you're a homeowner and a DIY enthusiast, you may be on the lookout for a fun, satisfying, and relatively inexpensive project to spruce up your backyard. A simple backyard waterfall can wow your kids, show off your handiwork, and spark conversation at your next barbecue — all without draining your wallet. Whether you're dreaming of a cascading stone feature or just a gentle trickle over rocks, this creative project lets you to utilize the materials you have on hand and turn your home into a private retreat.
The beauty of a DIY waterfall is that it doesn't need to be massive or extremely costly to make a significant impression. With just a few basic supplies you can create a pondless water feature that's right for your garden or backyard. You'll need to secure a pump, tubing, and a few natural elements like rocks, mossy logs, or anything that fits your aesthetic. Of course, you can always finish it off with potted plants and sparkling lights all around the base of your creation — for added charm.
How to build the DIY waterfall of your dreams
Before you break ground on your waterfall, there are several factors to consider. For starters, be sure to double check that your land is on a slight incline. Building on flat ground can make construction trickier and put long-term strain on your pump. Choose a location with easy access to both water and electricity. If you're set on placing the project on the far end of your backyard, you can still make it work. Dig a trench to set up water and power lines and use the removed soil to terraform a makeshift slope. Just bear in mind that these complications will add time and expenses to your overall project. This is why it's important to outline your ideas before diving in, to ensure that your outdoor upgrade isn't a money-waster. You'll also want to ensure that you've got a pump suited to your design specs, as most pumps are rated for specific volumes of water.
Once you've got your placement worked out, begin by digging into the soil, and laying down a fabric underlayment and a waterproof tarp. This will retain your water as it flows through the pump and prevent jagged rocks from poking through. You'll want to dig roughly 18 inches into the soil to ensure that you have enough space. Include 6 inches between where you're placing your pump and the wall of the basin to allow ease of access for repairs and adjustments down the line as well. Once tarp is in place, drop in your water pump, as well as your power source for the project and some stabilizing material such as Aquascape AquaBlox or milk crates. Finally, cover everything with your weed liner before stacking river stones or flagstones to create the base.
Customizing your waterfall
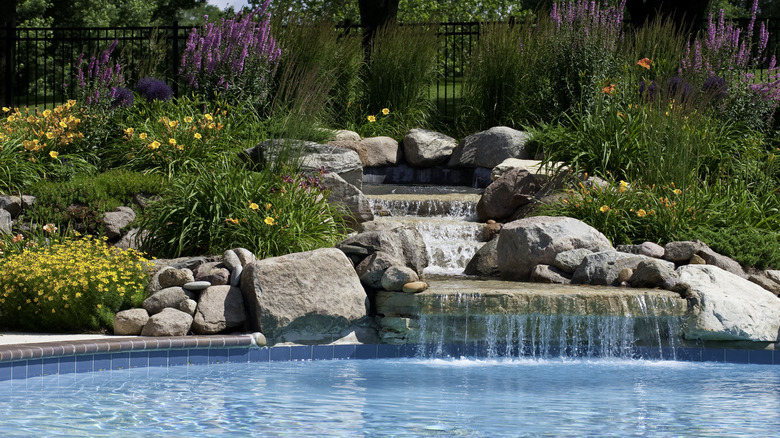
After you've got your base of rocks established, you can feel free to get creative. Stack the rocks alongside a sloped portion of soil to create a small, burbling waterfall, or place a waterfall spillway high above the basin for a homemade Niagara Falls replica. Be sure to repeatedly test your pump along the way, to ensure that you're not twisting the water hose or disconnecting from your power source in the midst of your build. Finally, fill in any gaps between the large rocks with small pebbles or gravel, and be sure to add some natural greenery into the mix as well. Before long, you'll have a low maintenance oasis in your backyard that will stun visitors unlike any other weekend DIY.
Of course, you can expand the project even further if you have the time, money, and know-how. You can even expand the affair to add a waterfall to your swimming pool or place it above a pond where your children can swim amongst the local wildlife. Any way you slice it, it's always nice to have the sights and sounds of moving water near your home, keeping you in touch with the peaceful vibes of nature.