Erin Napier's Genius Trick For A Stunning Faux-Stone Planter On A Budget

A stone planter adds a touch of natural serenity to any outdoor space, but they can be expensive and heavy. Even cast stone, which looks a lot like stone but is made from a concrete mix, can be 75 pounds or more. If you like the look but not the cost or the weight, you can recreate it with a few simple hardware-store supplies and a plastic bucket or planter. In "Work of Art," HGTV's "Home Town" Season 9, episode 7, Erin Napier creates a faux stone planter using a large plastic bucket and a surprising material: joint compound or spackle. Layers of dried joint compound give a plastic pot a textured stone look, without all of the weight. And whether you leave it untreated or paint it, the neutral shades you can achieve are some of the best colors to use in your outdoor spaces.
While both spackle and joint compound are used to fill holes and dings in plaster or drywall, for this project you'll want a formulation featuring minimal shrinkage. In some cases, spackle may be the best choice because it dries faster and is less likely to shrink. In the HGTV clip, the product Napier uses appears to be DAP DryDex lightweight low-dust joint compound. This product is pink when wet, but cures white, which lets you know when it's ready to sand, paint, and use. Regardless of which compound or paste you use, opt for one designed for exterior or outdoor use to stand up to the elements.
Layer spackling on by hand for a great stone look
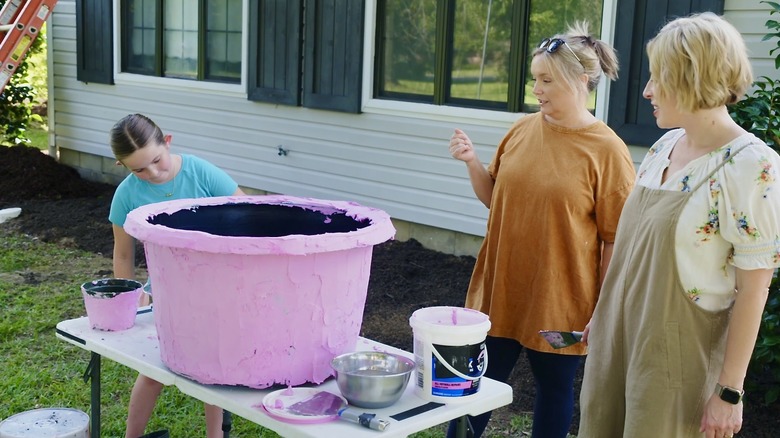
Choose a pot, bucket, or tub that is sturdy and somewhat flexible, rather than something like a nursery pot that cracks and breaks easily. Durability in the beginning means your upgraded planter is more likely to last a long time. It's also easiest to work on a surface outside. Use cardboard or a sheet of plastic to protect your work surfact, and wear disposable gloves — things can get pretty messy.
Purchase a fair amount of low-shrinkage joint compound; the exact amount needed varies on the size of the pot or pots you're covering. If you like, you can mix in line chalk or acrylic paint to add color, the same way you add texture or color to a DIY faux limestone planter. Spread the joint compound around the perimeter and top of the plastic vessel using a putty knife. Keep spreading until it's covered and looks almost like a plaster work of art. You can use your fingers to create more texture. While it's wet, rework areas as needed. You can also sand it when dry.
The pot is ready to use once the joint compound cures. If you'd like another color, feel free to spray paint over the joint compound or stipple dark wax for an antiqued look. You can even create embossed patterns using a hot glue gun and silicon pattern molds for a satisfying, stylish DIY planter upgrade.