Repurpose Extra Pie Tins To Craft Durable Patio Wall Art
We may receive a commission on purchases made from links.
As a fun decorative element, daisies captures simplicity, warmth, and charm. In fact, English daisies are even a wonderful plant to add whimsy to your garden. Whether you have room to grow daisies or not, the blooms unfortunately only last so long. Adding some daisy-themed decor to your outdoor spaces creates a bright, playful look that lasts all year long. Skip the lines at the home design shop, and make your own daisy decor from items you may already have on hand, such as extra pie tins.
It's easy to repurpose a series of seven sturdy metal pie tins, or one pie tin and six cake pans, serving as the white ray flowers or petals and the yellow disc floret in the center of a daisy. Outdoor-worthy spray paints provides the cheerful colors, and hot glue holds it all together. When finished, this large wall-art piece looks stunning on the side of a garage or shed, along a tall fence, or even on the exterior back wall of your home to add extra cheer to the back porch. If you have any pie tins remaining, use one as a makeshift baffle to protect your bird feeder from squirrels with the baking staple. Pie tins and cake pans are also an ideal size to use as molds for DIY garden path stepping stones decorated with vintage dinner plates.
Repurpose pie tins into daisy-themed wall art
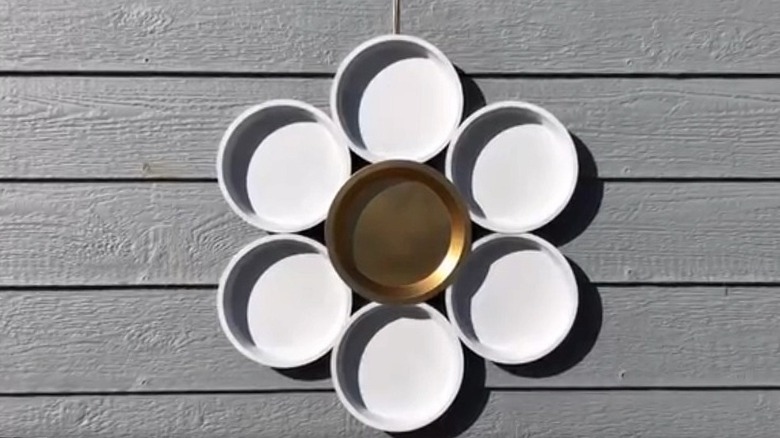
To start, find seven durable pie tins of the same size, or six cake pans and one pie tin, all the same diameter. Clean each thoroughly and let them dry. Spray one pie tin in gold or a cheery yellow paint, such as Krylon Fusion all-in-one adhesive spray paint, which is both a primer and a paint. Spray the remaining 6 pans bright white. After they dry, position the tins so the yellow one is in the center with the white ones evenly surrounding it, emulating a flower. All the tins should be touching their neighbors and the center tin.
Apply clear silicone adhesive or hot glue around the back side of the lip of the center pan, and press it into place atop the ring of pans. Once the adhesive dries, carefully flip the structure over. Apply more adhesive or hot glue over the connected areas to ensure they stay together. Decide which tin will be the top, and using duct tape, adhere a loop of sturdy twine to the tin for a hanger. For an even sturdier version, drill two small holes in the flat bottom of the top pan, near the top, and loop wire or ball chain (like the kind used for dog tag-style necklaces) through it. You can even screw the art directly into the wall or fence if it's wood, and you don't mind another couple of holes.
If your assembly still needs support, affix strips of painted wood to the back, spanning several pans, in a way they're not visible from the front. If the whole thing seems a little simple, you can add images or figurines, like bees or butterflies, on the flower's petals.