DIY Faux Stained Glass For Stylish Garden Planter Labels
There's something wonderful about the way light shines through stained glass, creating colorful beams beyond the glass. True stained glass can be expensive, and possibly hard to come by in the style and size you seek. While you could learn the intricacies of working with stained glass to create your own, a simpler faux version upcycles something that might otherwise be destined for the trash: clear plastic containers, such as the clamshell-style used to package some foods, or even the hard plastic product packaging used to hang small items on display hooks in stores. Though it's technically a recyclable PET plastic, many recycling facilities won't accept it due to difficulties with the process. From the DIY standpoint, this leaves plenty of material to work with, as any smooth part of that plastic makes an excellent form for faux stained glass plant markers.
These faux stained glass creations can be anything you like, such as the shape of a carrot or tomato to mark those respective plants, or even a cute ladybug saying the word "basil" to use as a marker for the basil in your garden. Any design or theme you can draw can be made into faux stained glass, but keeping it simple with minimal lines, coloring-book style, works best. To make the "lead" borders and the stained-glass colors, you'll need a dark puff paint, plus some food coloring and Mod Podge. Use your new plant markers to label any of the fuss-free plants that are great for beginning gardeners. The colorful sight of these markers just may make you enjoy your garden even more, as yet another example of why gardening is good for your health.
Making adorable markers for your garden plants
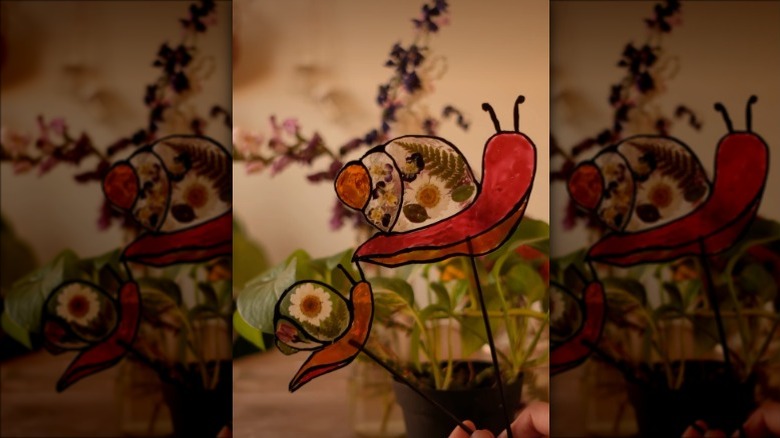
Draw a design on paper for each plant marker and make them the actual size you'd like the stained glass. Place the clear plastic sheet over a design, then trace the lines onto the plastic using a dark puffy paint such as Tulip Puff Paint. This outline acts as faux lead came, the dark borders that hold real stained glass pieces together. Allow the paint to dry completely. Make the colors by pouring some Mod Podge into separate disposable cups, using one cup for each color. Add a few drops of one food coloring color to each cup. Stir the food coloring into the Mod Podge with a toothpick. Don't worry about the mixture looking opaque at this point; it'll dry clear and colorful, much like stained glass.
Paint each section of your plant marker(s) with one color of the mixture; any inexpensive craft-grade paintbrush will do. Make sure all areas are covered in color, much like filling in the areas between the lines in a coloring book. If you'd like to add some dried flowers to certain areas, paint those areas with straight Mod Podge and set the flat flowers in them right away. Once all areas are dry, it's time to add stakes to stick the markers into the ground. Stiff wire such as coathanger wire works well; just trim it to size with wire cutters. Craft sticks and barbecue skewers also work; really, anything of suitable size that you can repurpose does the job. Secure the stakes to the faux stained glass with durable clear tape, such as small pieces of packaging tape. Set the markers near your garden plants in an area where they'll catch some sun, then enjoy the view once they're illuminated by sunlight. For even more plays on light in your garden, repurpose wine bottles for colorful garden edging.